Welcome to our garden

It’s hard to believe that just one year ago, we were completely immersed in a rehab and preparing to move — whew!  In contrast to the spring of 2016, we’ve spent the spring of 2017 turning the yard at our new house into a garden to rival our old commuter garden.

Speaking of the old garden, it is more or less finished.  Matthew had considered continuing to use that land for low maintenance, high space needs crops, like winter squash.  For better or worse, the municipality where our commuter garden was located — let’s call it Jerkwood — squashed that plan when they decided that the chicken wire fence that kept rabbits out of the garden for YEARS was no longer acceptable.  No affordable rabbit prevention = no garden.  I started a longer post dedicated to the subject last fall, but at this point, it’s probably best to let it go . . .

. . . so here we are with our very own backyard garden!

After a few years of helping with the commuter garden, I’d largely removed myself from the garden scene — the all day Saturdays, especially in the heat of the summer, were just not working for me.  Matthew has done the majority of the work to date in our new space, but with a bit more free time now that my classes are over for the year, plus the incentive provided by the harvest, the garden is sucking me in, bit by bit.

Kale yeah!

Turns out that weeds threatening to choke out my beloved cilantro (and other yummy plants) are great motivation to weed!  Also, weeding is strangely satisfying (though having less of them to remove will also be quite satisfying).

Gabriel’s garden

Gabriel has his very own 4×4 plot.  He is most excited about his beloved ground cherries (not yet planted in the above pic).  Matthew wisely suggested radishes for a quick spring win, and Gabriel was very proud to contribute his radish harvest to our meals.

After a misguided attempt to have grass paths in between the beds (too much work!), we’ve reverted to our coffee bean bag pathways.  I’m interested in trying a biodegradable weed barrier that I read about in Mother Earth News (like this).  I assumed that it would be prohibitively expensive for the amount we’d need, but for a little over $100, we could cover almost all of our vegetable beds, and if it works, that would be money well spent!

Currently harvesting

  • Kale (a few different varieties — Red Russian is my fave!)
  • Spinach
  • Cilantro (a little bit — would love to have more)
  • A few strawberries
  • Garlic scapes
  • Lettuce
  • Arugula
  • Artichokes
  • Turnips (we like the sweet haikuri variety)
  • Rhubarb

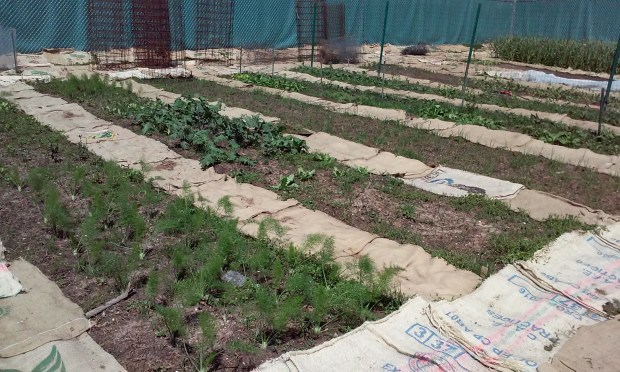
Each of the beds is 4′ x 30′, and there are twenty-seven vegetable beds.

Coming soon (or soonish)

  • Sugar snap peas
  • Snow peas
  • Swiss chard
  • Fennel
  • Onions
  • Carrots
  • Beets
  • Broccoli and other cruciferous (if they don’t get too grumpy in the heat)

In the ground for summer harvest

  • Garlic (planted last fall)
  • Tomatoes — lots of varieties
  • Sweet peppers
  • Eggplant
  • Potatoes
  • Corn
  • Green beans
  • Basil
  • Cucumbers
  • Summer squash
  • Edamame

In the ground for fall harvest

  • Celeriac
  • Sweet potatoes
  • Winter squash
  • Peanuts

. . . and probably more than a few things I’m forgetting!  We also have blackberries, red raspberries, and black raspberries planted, plus a bunch of baby fruit trees and blueberry bushes.  The trees won’t yield much this year (and I think we’re supposed to remove any fruit that sets so the trees can put their energy into general growth), but they’ll be fun in years to come!

Stay tuned for more garden posts!

Three month house-iversary

This Saturday marks three months living in our house.  I am happy to report that, as of last week, all of the boxes are unpacked (at least all of the boxes that are intended to be unpacked vs. used for storage in the basement).  There are still some homeless items here and there, as we finish some storage-related work in the kitchen and closets, but things feel pretty settled.

14086408_10102238655827627_2175679519948922678_o

The third iteration of the front room seems to be the charm.  We’re still working on window treatments in that room and a few others.

Over the past three months, we’ve discovered answers to some burning questions, such as, “What weather conditions created those water stains on our basement walls?”

Answer: >3 inches of rain in a 24-hour period does the trick.  Five+ inches of rain in less than 24-hours creates the really cool effect of our basement window wells looking like mini aquariums — just add fish!

Fortunately, the water is rather well behaved, and by luck or good design proceeds nicely through the crawl space, down the basement walls, and into the floor drain.  Also, I took those water stains into account when I was organizing the basement, and kept anything that could be damaged by water in safer spots.

So, the general pattern is, we get a shitload of rain in a short period (which seems to be the new norm — thanks, climate change!), the window wells fill with water, water trickles into the basement and runs to the floor drain, the dehumidifier works overtime, and all is good until the next Crazy Rain Event.  We’re considering options to remedy this, but it doesn’t seem all that urgent.

More troublesome is the answer to the question, “How bad is the traffic noise (that a realtor friend who used to live on the same street warned us about)?”

Answer: For me, it’s usually a background thing, not that big of a deal.  For Matthew, who gets migraines and is sensitive to such things — kind of a big deal.

A big enough deal that if we don’t find some form of effective, affordable sound barrier, this house, the house that we hunted for for seven years, and planned to live in for a really long time (defined as five years by G, but we were more thinking add a zero to the end of that number), might be a time-limited proposition.

Whomp, whomp, wah.

We’ve started looking into options for sound barriers, as our planned privacy hedge won’t do much on the noise-reduction front.  Matthew found a material called AcoustiBlok that can be attached to a chain link fence, but he’s having trouble getting straight answers about longevity from the company.  We need some answers because, despite being billed as “economical,” the cost climbs quickly when you have a big yard.

I’m wondering if we could do some kind of wall with insulated concrete forms, or some other kind of concrete wall sound barrier, but I haven’t found any great information on this yet.

Until we know if we can get the traffic noise down to a level that makes this house happily livable for all members, discretionary projects are on hold, including plans for solar panels and a sun porch addition.

Although it wouldn’t really make sense to put in the effort to establish a big garden if our time here is limited, we’re probably proceeding with that, if for no other reason than we’ve killed all of the grass, so we have to do something.  And if we can make this house, in this location, work, it really is ideal for us in many ways.

I’ve mostly gotten over the initial impact of this maybe NOT being our forever house (because you really never know, right?), but the uncertainty, the waiting to move forward with planned projects, is tough.


Kitchen conundrums

Overall, I think we did a great job on our kitchen design — maximizing a relatively small space, staying within budget, and working around multiple doorways and a large window (lovely for natural light, but does limit options).  However, a few things have come up as we’re settling into the space.

Where to put the dish drainer
Despite having a dishwasher (which we enjoy!), there are a number of things I hand wash, including pots and pans, the plastic lids to our glass Pyrex containers (trying to baby them), our water bottles, etc.  In addition to holding these items, our dish drainer houses dishes that don’t get fully dry in the dish washer and our Neti pots and the jars we use to heat our Neti water.  For us, it’s been something that is always out.

At our apartment, our sink was placed diagonally in a corner, and our dish drainer fit perfectly into what would have otherwise been dead space between the sink and the wall.  But now our sink is on an island, and the dish drainer is hogging valuable space, including what will be part of the counter for our bar-style seating.

20160713_124444

Note: That is the clearest (i.e., least cluttered) the island has been since we moved in!

Back to what to do about the dish drainer . . . .

  1. Live with it
  2. Get a slightly smaller model and live with it
  3. Buy a dish drainer that hangs across the sink (trade-off here is less usable sink space)
  4. ??? — I’d love to hear other suggestions here.

While it’s not the end of the world, this issue makes me wish we’d flip-flopped things, putting the sink against the wall and locating the stove on the island (though that may have presented other issues), but this is what we’ve got.

Related note: We now have barstools!  I found a set of three basic wooden stools on Craigslist for thirty dollars — score!

Faucet spacing issue
Our counter tops were a bit of a splurge, and a bit of a gamble on the color (which we love).  We were told to have our faucet of choice ready on installation day.  Along with the faucet, we provided a spigot for our water filter (we bought the under-sink retrofit kit for the filter we’ve been using for several years).

On the day of the installation, neither Matthew nor I were on-site.  We left the installers a note specifying that the water filter should be installed to the left of the main water faucet, and the sprayer should be installed to the right of the main water faucet. 

The installers called Matthew at work to inquire about the spacing for the faucet and sprayer.  Not being there to see, and not being the professional installer, Matthew asked what was standard, and they replied, “Four inches.”  So they installed them with four-inch spacing . . .

20160713_124227

. . . which, it turns out, was not really enough.  It kind of works, if you put the sprayer back in just so (i.e., facing perfectly forward) and/or don’t turn the water on all the way.  This picture was actually taken after they came back out and adjusted things slightly, pushing the main faucet a bit closer to the filtered water supply and the sprayer a bit more toward the outside.

The adjustment that was already made is basically as good as it gets without ordering a whole new slab of quartz for the island.  On one hand, this seems wasteful.  On the other hand, this was installer error, and we plan to have these counters for a long time.  Having it not right is frustrating.

If this was your kitchen, what would you do?  Live with it, or request they make it right?

To pegboard, or not to pegboard
I got the idea of pegboard for kitchen storage from reading about Julia Child’s kitchenI wasn’t sure it would work in our space, but I tagged the idea for consideration.

20160713_124517

Fast forward to our almost-finished kitchen, and we have a wall space where pegboard would be an option.  For durability, I would use metal pegboard, rather than the fiberboard material.

We have already ordered a couple of utensil-hanging rails, so the current plan is to install those and wait and see on the pegboard, which would be the pricier option, once we buy both the metal pegboard and the accessories.  Pegboard provides lots of versatility, so that might still happen someday.

Clothesline options
This is not really kitchen-related, but I’m tossing it in here anyway.  In general, I prefer hanging laundry in the basement — because I’m a vampire, and because the sun fades things, and pollen, etc. — but we don’t have a ton of space in our basement, especially right now.  An option for outdoor clothes drying would be great.

Anyone have any favorite out-door clothesline set-ups?


Moved!

Ten months.  That’s how long it took from first seeing the “For Sale” sign to move in day, but we were patient and worked hard (and all the stars aligned), and for the past two-and-a-half weeks, we’ve been living in our house!

The final weeks leading up to moving day were busy and stressful — everything you could want for a move, right?  But we wrapped up most of the work, got our occupancy permit (with a few minor violations to address), packed lots of boxes (is anyone every completely ready when the movers show up?),  and finished painting all but one room in time for moving day.

The move itself went quite smoothly, a marked improvement on four years ago.  And then the exhaustion hit.  Once the adrenaline was gone, the effects of sleep deprivation (and perhaps low iron?) and cumulative stress set in, and I was nigh upon worthless for a number of days, but I feel like I’m reentering the land of the living.

There are still more boxes to unpack and additional repairs / finish work needed, but we’re starting to feel settled.

20160705_123438
Front room, AKA living room
20160705_125031
Breezeway, AKA dining room (/office)

We started off with the two rooms above flip-flopped (dining table in front room and sofa in breezeway), but it just wasn’t working, so we switched to the current configuration.  In addition to just feeling better, this set-up means we’re eating in the room with the old laminate flooring (vs. the newly refinished wood), which is nice, especially with a kiddo involved.  It also means I am happy with our current dining table (I wanted a rectangular table for the front room) — one less thing to buy.

Sneak peek at the kitchen

We have quite a few ends to tie up in the kitchen: glass fronts for the wall cabinets (until then, enjoy our “invisible” glass), tile around the top of the island (over plywood visible here), buying bar stools, decluttering the island so we can actually use the bar, installing the shelf for the microwave, and replacing some baseboard.  Fortunately, those things don’t affect the function of the kitchen, and we’ve already cooked a number of tasty meals (and a pan of peanut butter brownies) in the updated space  The kitchen will get it’s own post in the future.

So, there you have it — the reason for the radio silence around here for the past several weeks!  We’re very happy to not be running between the apartment and the house anymore.  You don’t have to worry about us spending too much time on the sofa though — garden planning is in full swing!

Losing the lawn

Well, we finally have the huge, sunny yard we’ve been wanting  . . . and it’s covered with zoysia grass. Zoysia is a drought-hardy, warm season grass, which means you can’t just kill it by letting it dry up.  It will also readily invade our garden beds (which will be most of the yard) if we just till and try to work around it, so it’s got to go.

This resource from the University of California lists several methods for removing warm season grasses.  Any of the effective methods will involve noticeable time and money for a yard our size.

Our plan is to use solarization, which basically bakes the grass to death by trapping the sun’s heat underneath a sheet of thin plastic (you know, the good ol’ greenhouse effect).  This means that we have to buy a lot of plastic, and stay off of the yard for several weeks.

We will likely use sheet mulching in a couple of areas, primarily to create some walkways through the plastic-covered portion of the lawn.   This may, in some ways, be the “greenest” option, especially if we obtained enough old cardboard, but at 4 layers of cardboard over the entire yard, that’s a LOT of cardboard (and mulch, which you need to cover the cardboard).

All of the plastic for solarizing is far from the greenest thing ever — not sure how to weigh that against multiple rounds of Round-Up — but in the end, we’ll be on our way to having a space that is growing food, not lawn (so ready to be done with the mower!).

Solarization has additional benefits, according to the U of C guide: “This method not only kills grass but can also improve soil structure, increase nitrogen availability and reduce some species of nematodes and soil borne disease.”  Sounds good to me!

If all goes well (i.e,. we can afford to buy All. The. Plastic. and the solarization works), we will be laying out our garden beds, perhaps in time for some fall planting.  Once the grass is gone, we’ll bring in some compost as well as any indicated soil amendments (Matthew took soil samples for testing waaaaayyy back in December), and get our garden on!

We’d love to hear from others that have successfully used solarization (or other methods) to get rid of warm season grasses!