As I put away our leftover honey beans on Monday night, I happily realized that the fridge held enough leftovers to provide lunches for the rest of the week. That knowledge removes the pressure to continue making big, leftover-yielding dinners, buying me an easy night or two of sandwiches, pasta, or leftovers for dinner instead of just for lunch.
In order to keep track of all the leftover goodness and avoid food waste, I grabbed a piece of scratch paper and sketched out our lunches for the week.
The full lunch menu — most of the veggies in the dishes are locally grown:
Monday: Kale quinoa quiche with a side of squash Tuesday: Black bean soup w/avocado and tortilla chips; side of collard greens Wednesday: Rotini w/red sauce and sauteed eggplant, ‘shrooms, and squash Thursday: Polenta topped with black-eyed peas, collards, and sundried tomatoes w/a side of roasted sweet potatoes Friday: Honey beans, whole wheat bread w/olive oil, sides of squash and kale
On the top half of the page, I brainstormed dinner ideas based on what we had to use and what types of food (i.e., rice, lentils, tofu) we haven’t eaten in awhile.
Our fridge full of leftover goodness (and a huge hunk of rising Danish pastry dough, second shelf from top, on the right). A bit crazy, but I have a pretty good mental map of what is where, and this is nothing compared to high gardening season when we’re truly overflowing with fresh produce.
In case you were wondering, I have yet to use my “coasting” dinner (many weeks I don’t — it’s just nice knowing I have a cushion, if necessary). Tuesday night I made risotto (recipe coming soon) and Wednesday night I made a variation of my Persian stew, with lentils instead of chickpeas and [garden!] cabbage instead of cauliflower.
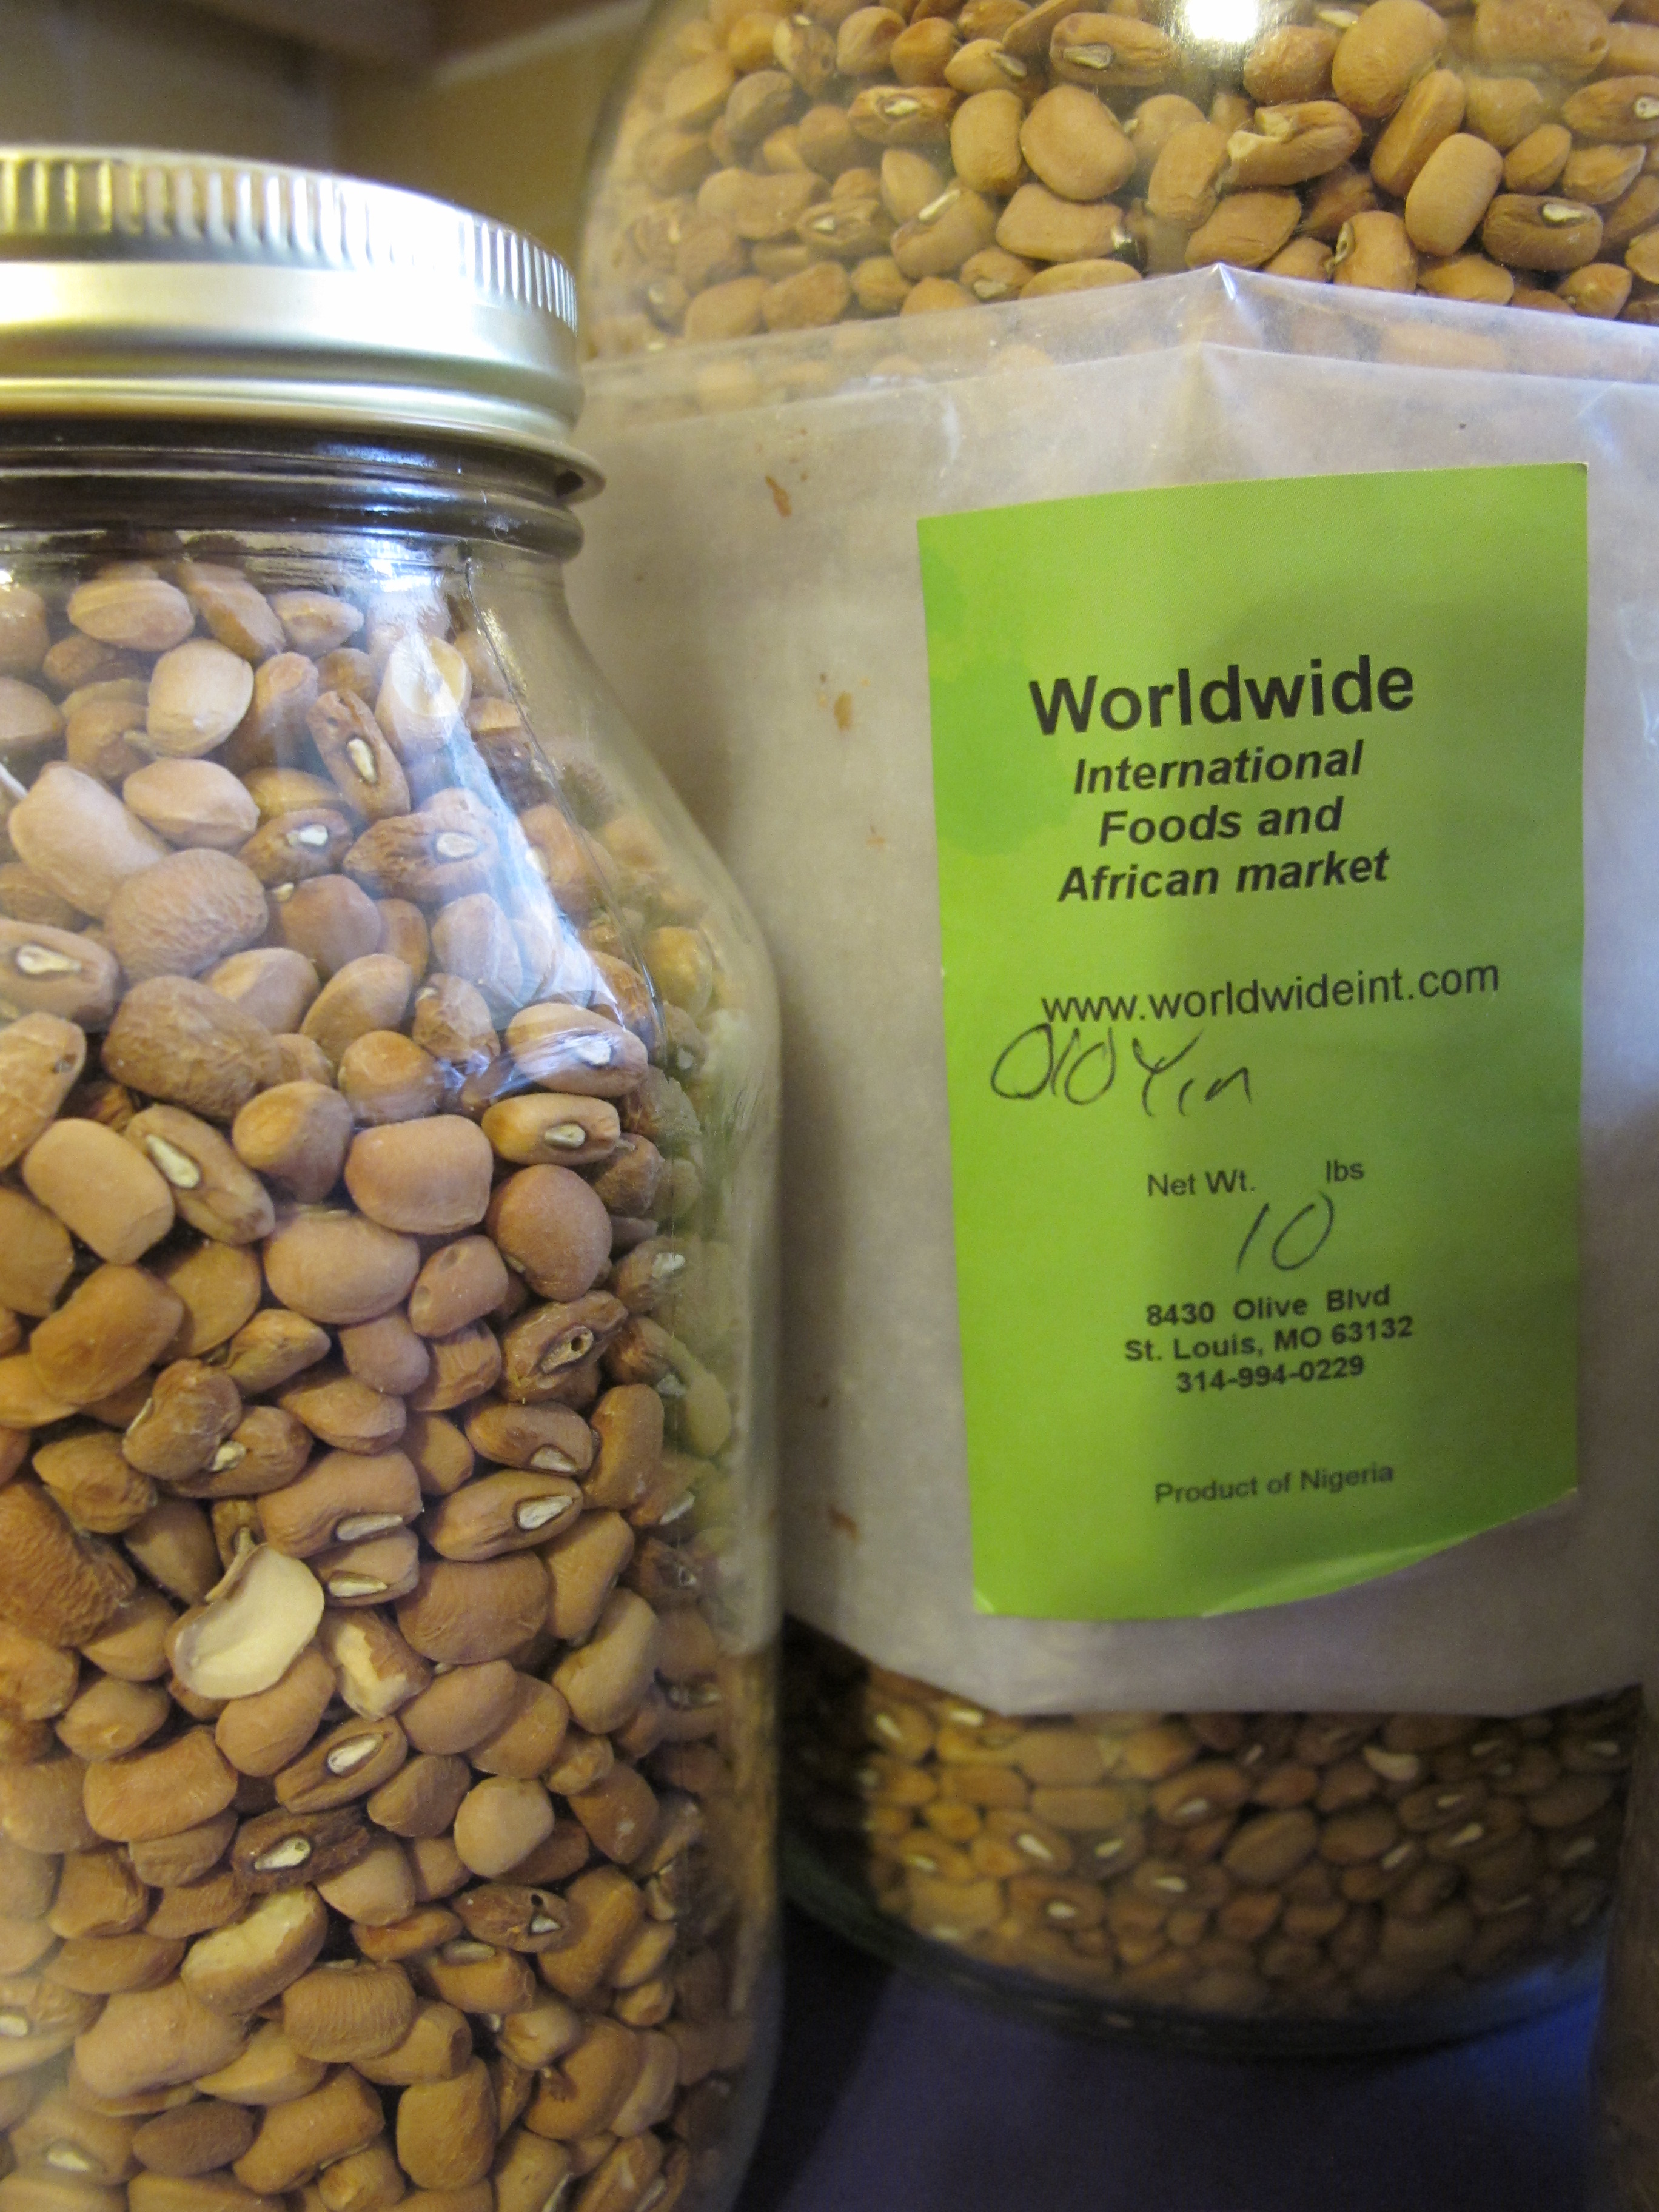
A couple of years ago, we ran into some friends at the Festival of Nations. They had already eaten, so we asked if they had any favorites, and they quickly recommended the African honey beans from the Nigerian food stand.
We took their suggestion, thoroughly enjoyed our honey beans, and started counting down the days until the next year’s festival so we could get our fix. In the meantime, of course, we played with the idea of making our own, but neither of our go-to international grocers (Jay’s and Global) carried the beans, a variety of black eyed peas that are inherently sweet.
Gabriel’s first taste of honey beans — yum!
This year, we visited the Nigerian stand again and asked the proprietor where we could purchase the dried beans. She directed us to Worldwide International Foods and African Grocery, a small store on Olive (just east of I-170) in UCity. The store in question is decidedly outside our normal walkable/bikeable radius, and it’s also not an area we frequent in the car (unlike the suburbs where my in-laws live and the TJ’s/WF shopping area).
Anyway, I attempted a bean pick-up back in early November, when I visited a friend who lived not too far away, but they weren’t open. Still no honey beans.
They fell of my radar until then I saw the article on honey beans in last month’s Sauce Magazine. Interest renewed. I wrote down the store address, called to check the hours, and jotted down the Yoruban name for the beans, “ewa oloyin,” in case that would make my quest easier.
Yesterday, with plans to look at a few houses just off of Olive, I made a second attempt, this time successful (well, sort-of). They were down to two bags of “oloyin” on the shelf, a two-pounder and a ten-pounder. We eat a lot of beans, and it had taken me FOREVER to actually get to the store and buy the beans, so I opted for the ten-pounder. When I checked out, I confirmed with the store clerk that the beans in the bag were, in fact, honey beans, since the label just said “oloyin.” He assured me they were.
With limited time until dinner, I used the quick soak method on the beans and worked on my rendition of the sauce while they cooked. When I tested the beans for doneness, they surprised me with their lack of sweetness — not a good sign.
Either a) the beans I purchased were, in fact, NOT honey beans, or b) they prepare the dish sold as honey beans at the Nigerian food stand with significant added sugar. (The annoying part is I don’t know how to find out if I bought the wrong beans.)
Anyway, I try to keep sugar consumption fairly minimal, especially for Gabriel, so the last thing I wanted was to dump a ton of sugar into the bean pot. I compromised by adding some dates (sugared, not what I usually buy, but this seemed like a good place to use them) to the sauce. The resulting dish, while not identical to what we had at Festival of Nations, was mildly sweet and quite flavorful.
Ingredients 3 c. dry honey beans*
1 c. bean cooking liquid (for the sauce)
1/3 c. chopped sundried tomatoes
1 c. chopped red bell pepper
1 t. onion powder
1/4 c. dates
1 vegetable bouillon cube
1 T. butter
2 t. peanut oil
1 T. coconut oil
Directions Soak beans, either overnight or using a quick soak. Drain, rinse, return to pan, add water just to cover, and simmer until tender but not mushy (about 45 minutes for this batch).
When beans are cooked, pour off most of the cooking liquid into a measuring cup and salt the beans. Combine one cup of the liquid with the sundried tomatoes, bell peppers, onion powder, and dates. Blend to a smooth, thick sauce using a hand or regular blender.
Combine all three oils in a small saucepan over gentle heat.** Add bouillon cube, cook for a few minutes, then add the sauce from above. Stir to combine well, then pour over the beans in the pan.
*The beans I was using may or may not have been actual honey beans — I may never know. The good news, if you, too, have trouble locating honey beans, is that you can probably replicate this dish with other beans (perhaps black eyed peas or a small white bean, like navy beans).
**Palm oil would be traditional in this recipe, but the labor and environmental practices around farming palm oil are pretty atrocious. The blend of oils/fats I used here was quite flavorful and worked well in the dish.
Rest assured that while it’s been awhile since I’ve talked food, we have been cooking and eating.
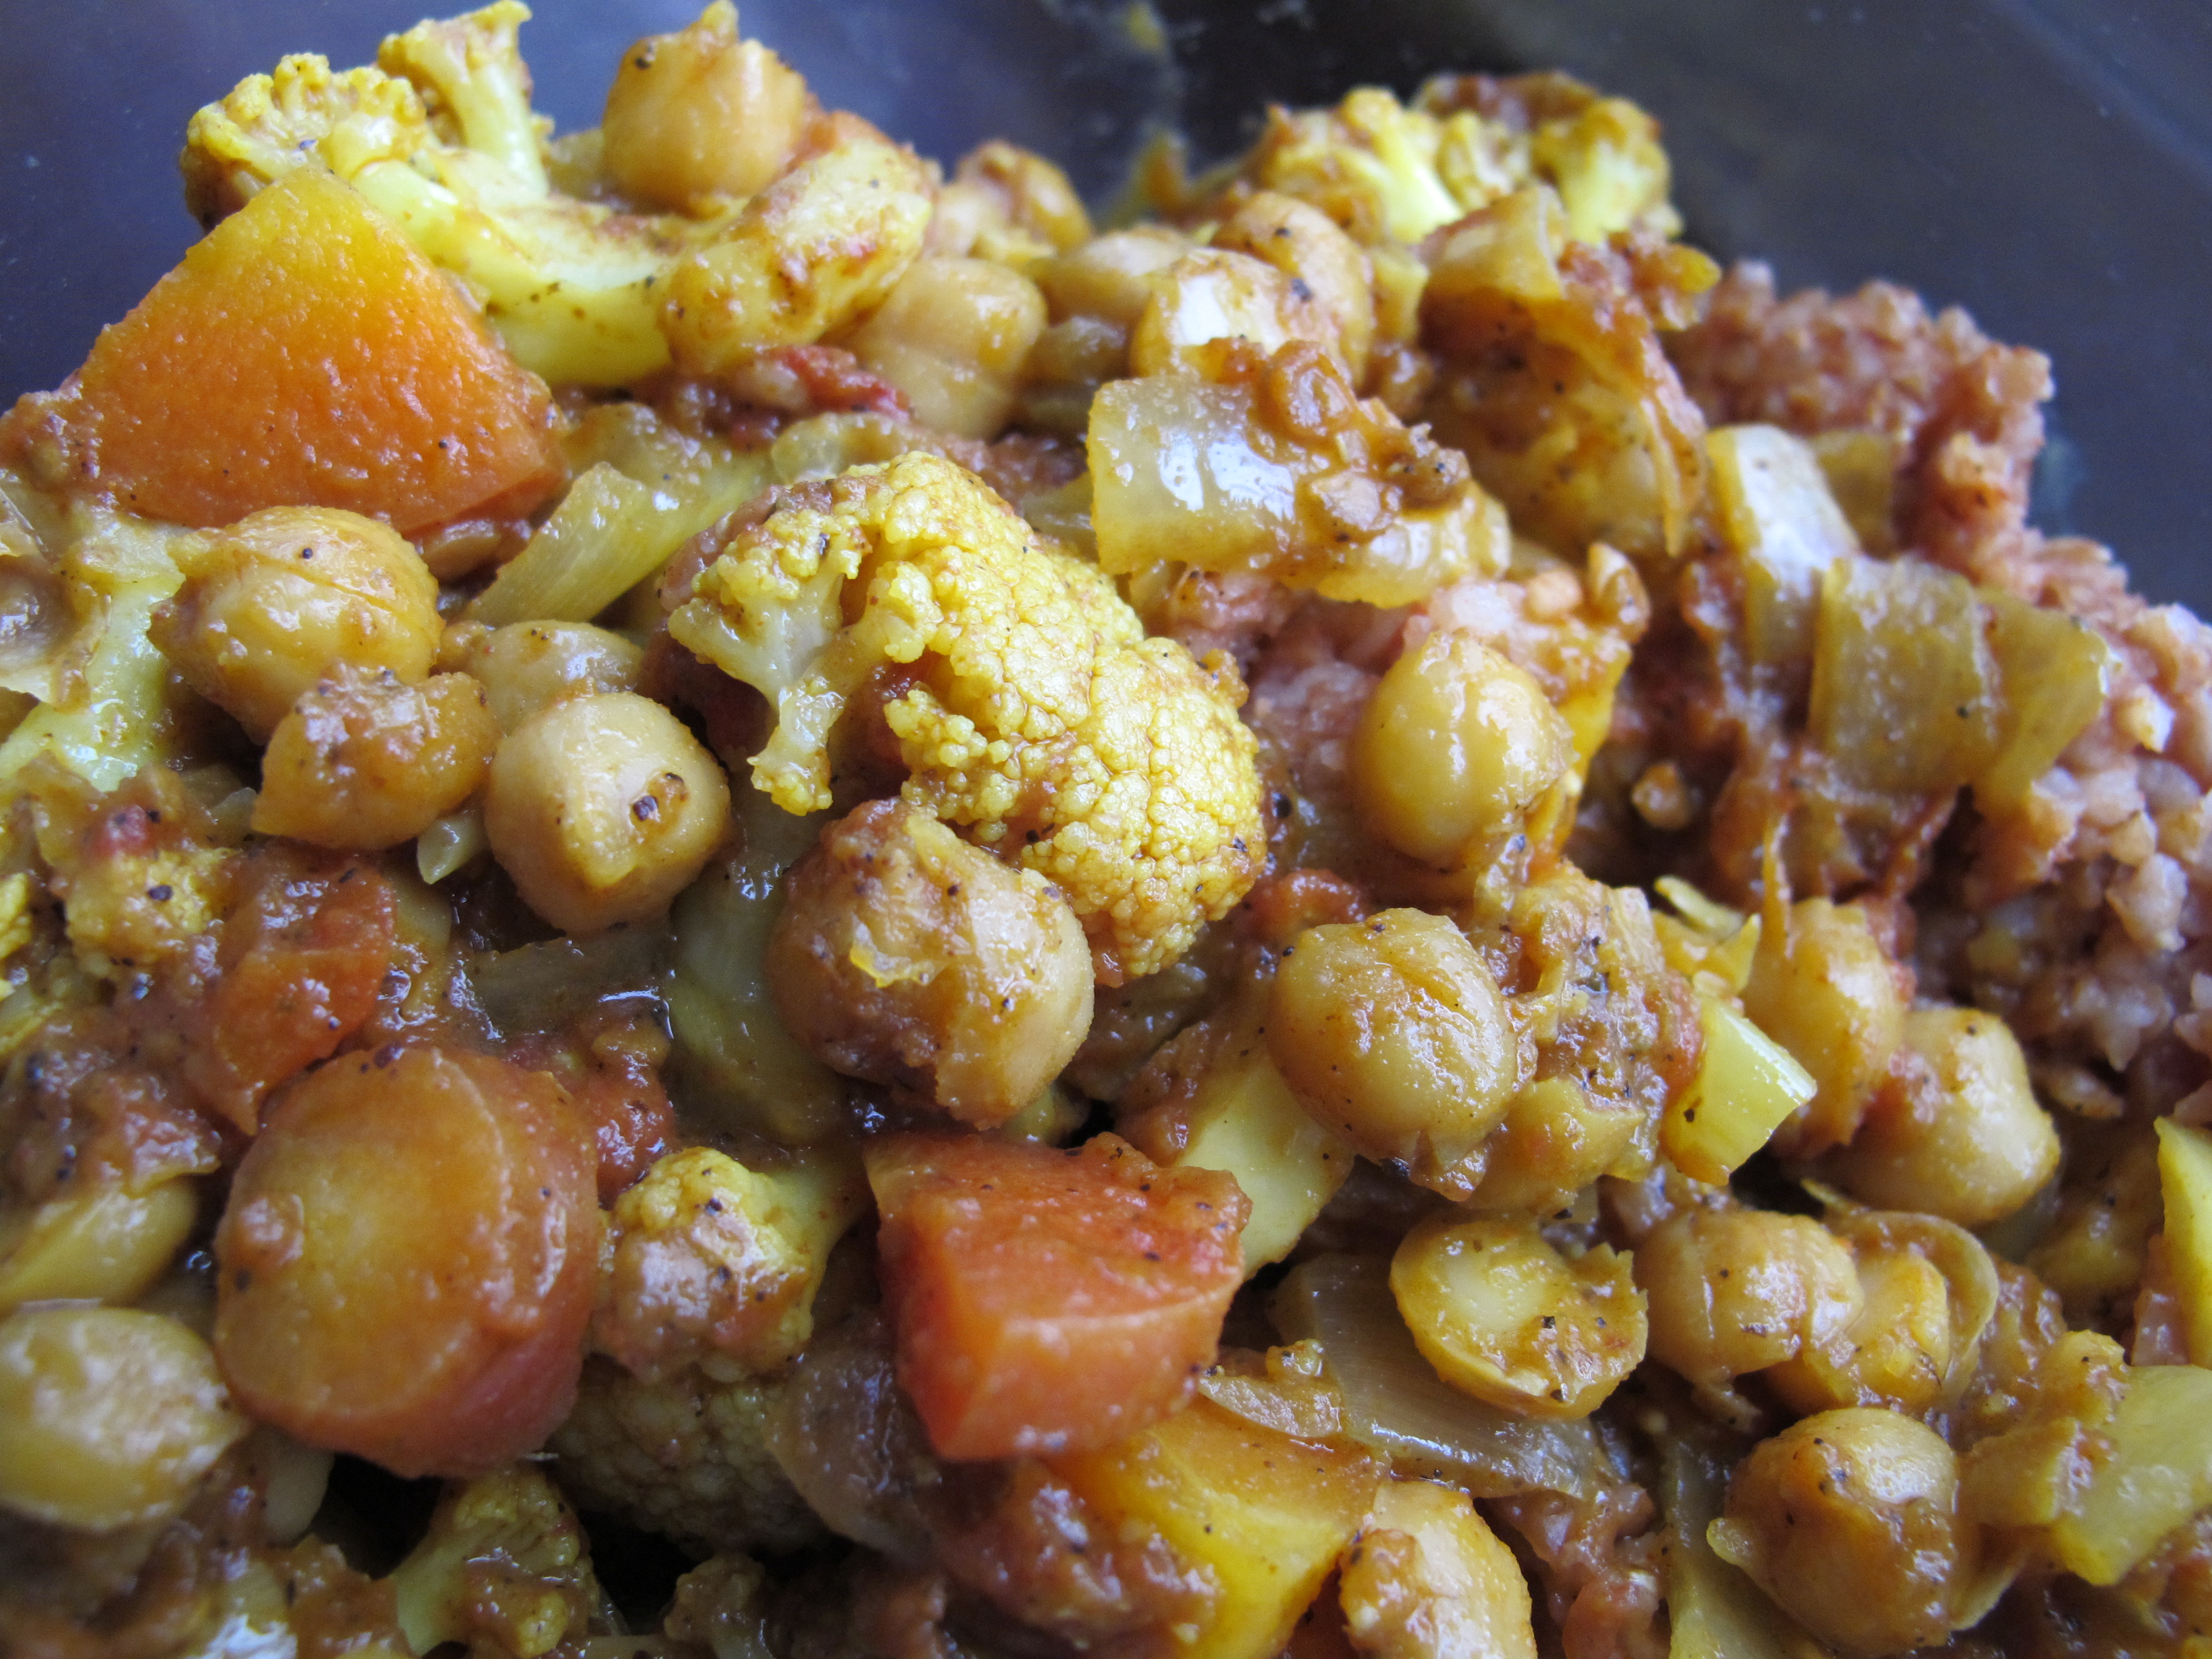
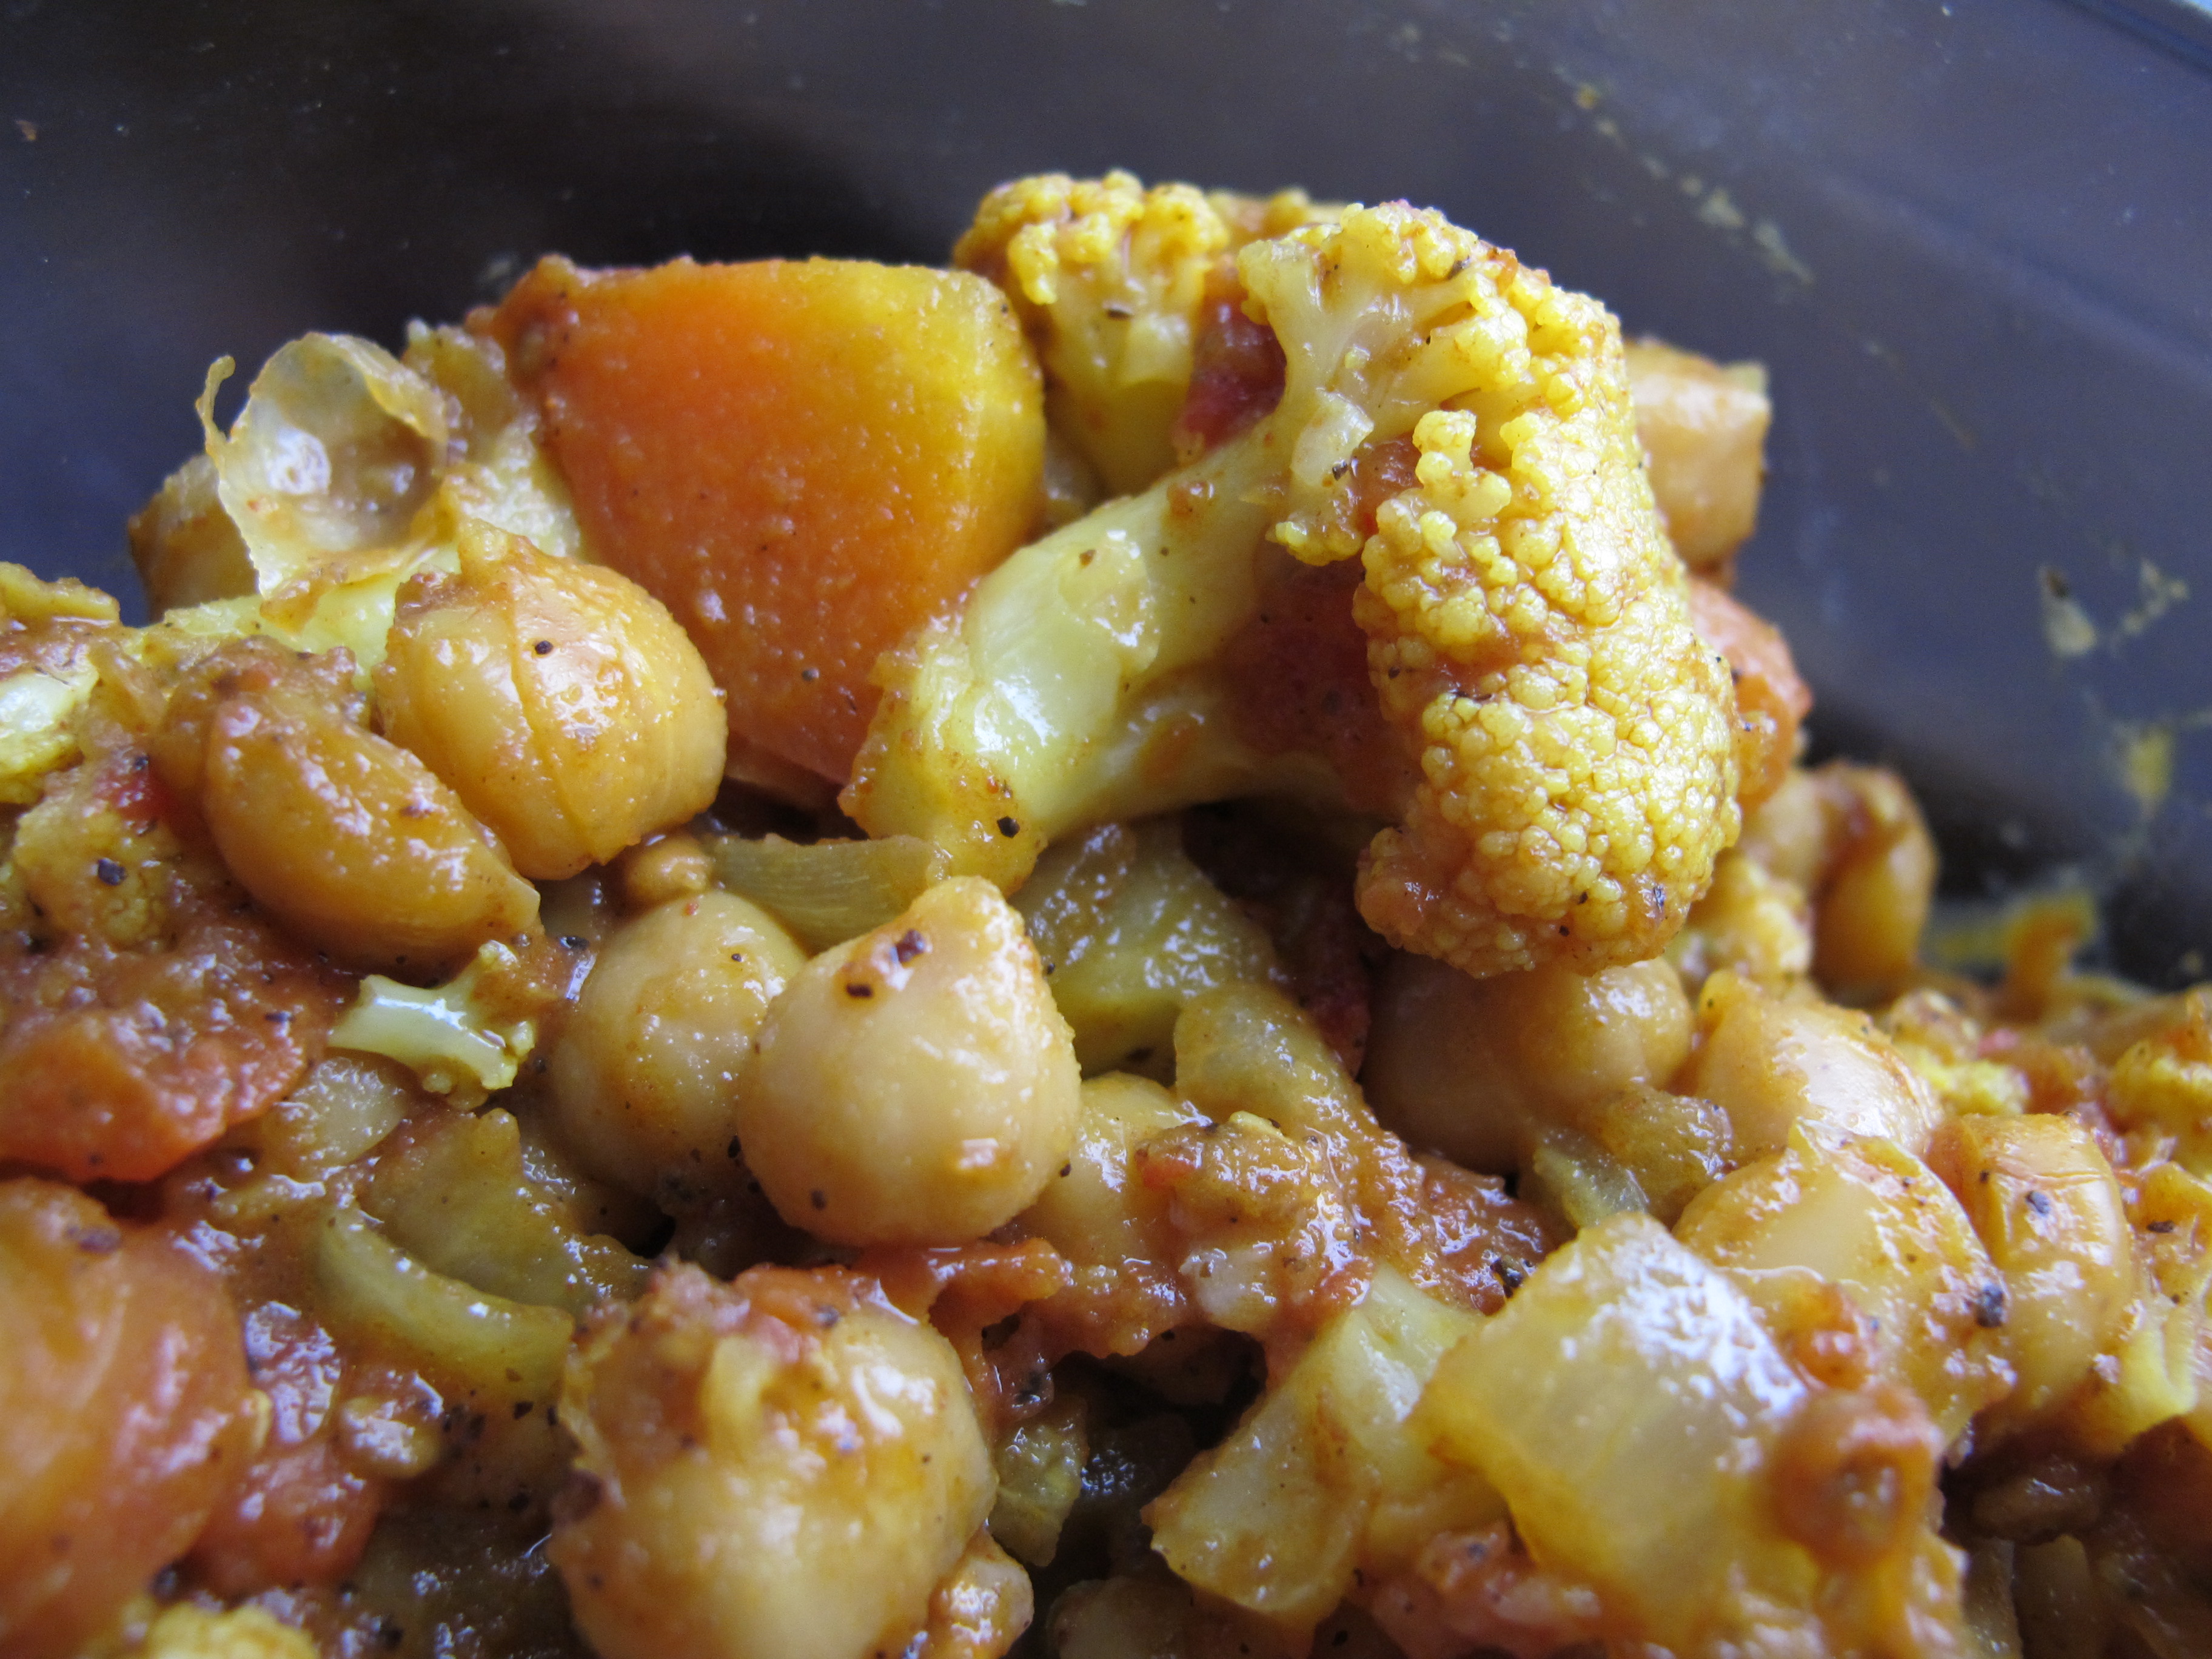
A few nights ago, I concocted this one-dish meal (well, okay, two dishes if you count the pan for cooking the grain) from on-hand veggies (fresh garden carrots and garlic, canned garden tomatoes, and farmers’ market cauliflower) plus my desire to work chickpeas into the meal.
Quite awhile ago, I bought a big bag of sumac, a spice commonly used in Persian/Iranian (and perhaps other Middle Eastern?) dishes in order to replicate the delicious veggie kabobs at Cafe Natasha. I regret to say that my attempt at the kabobs fell short of the real deal.
Anyway, I’ve experimented with the sumac in other dishes since then, and it worked particularly well here, creating a dish that I would be happy to order at Cafe Natasha.
Ingredients 1 cinnamon stick
1 t. sumac
1-2 t. paprika
1/4 t. tumeric
3/4 t. salt
1 quart jar tomatoes and their juice
2 c. chopped carrot
3 c. chopped cauliflower
2-3 c. cooked chickpeas
1 medium onion, chopped
1 bulb of garlic, minced
1 c. dry medium-cut bulgur* or millet
Olive oil for sauteing
Directions
Cook bulgur or millet in tomato juice, adding water to make 3 cups of liquid, with a cinnamon stick.
Saute onion in a large cast iron skillet with some olive oil. After the onion softens, add cauliflower, carrot, garlic, salt, and the spices, plus more oil as needed. Stir to combine and saute for a few minutes on medium. Add the tomatoes, plus a bit of water, cover the pan, and let simmer for 10-15 minutes, or until vegetables reach desired tenderness.
Serve over cooked grain. Season to taste with salt and black pepper.
I love the ease of [mostly] one dish meals, especially when cooking in cast iron. I just use a spatula to scrape the pan thoroughly when putting away leftovers, and the pan is ready to use (in my book, anyway) for the next meal.
*Oh, yes, my other reason for making this was using up some ridiculously old bulgur in my pantry. Mission complete.
While I generally prefer to let the color of my food speak for itself, I’ve long been curious about using real food instead of food coloring.*
With the holiday of pink and red right around the corner, I set out to make some edible Valentine’s — heart-shaped gingerbread cookies with beet-pink buttercream frosting.
A little digging uncovered two main approaches to using beets to color frosting: 1) juice the beets or 2) stir chunks of beets (which can easily be removed when their work is finished) into the frosting. We don’t have a juicer, so option number two was the obvious winner.
I headed to the kitchen, where I thoroughly washed my freshly harvested beet, then cut half of it into ten small chunks. I tossed a few chunks in with my white buttercream and began to stir.
After a few minutes, I saw some results, but realized that partially cooked beet chunks would yield more juice, and thus more color. I tossed six of the chunks into a ramekin, added a teaspoon of water, and microwaved it (covered) for a minute or so.
The result? Slightly tender beet chunks and a bit of vivid pink beet juice.
After cooling, I tossed the cooked beets and a bit of the juice into my frosting, which obligingly turned a lovely shade of pink.
For the frosting, I used our basic tried-and-true buttercream recipe, with equal weights butter and sifter powdered sugar, plus vanilla and almond extracts. Half of a smallish beet produced the color here for a recipe with a pound of butter and a pound of powdered sugar.
For comparison, I had a small amount of frosting colored with good ol’ Red #40 and Red #3: beet on the left, artificial coloring on the right.
In case you’re wondering, you can’t taste the beet at all.
Happy [almost] Valentine’s Day ❤
*While consuming small amounts of artificial food dye is probably not a big deal, I prefer to avoid them as much as possible, and, frankly, really deep-colored frosting with tons of dye just tastes disgusting.
While I’ve written quite a lot about our winter squash over the past couple of years, I’ve neglected the humble, but delicious, sweet potato. While winter squash are great, they require scooping out the goop, and you often don’t know exactly what you’re going to get until you cook it.
In comparison, sweet potatoes require less prep, and they are consistently delicious.
To give you a sense of scale, the knife in the sweet potato has a 6.5 inch blade. This big guy weighed in at just under five pounds. It really looked like it could have easily weighed ten pounds, but, while nice and solid, the flesh of a raw sweet potato is relatively dry.
We store them dirty (they keep better that way), so they all need a good bath and a bit of a scrub. I soak the whole potatoes in a bowl of water to loosen the dirt, then use an old toothbrush to scrub them clean under a very small stream of running water.
Here are some smaller roots, immediately after harvest. Matthew dug about 200 pounds of sweet potatoes from 10-12 plants last October. These sustained shovel damage, so we used them immediately.
The dry flesh of the raw sweet potato yields a rich, creamy product when cooked. My favorite, easy prep method these days involves roasting.
roasted sweet potatoes
Recipe by Melissa
Ingredients Sweet potatoes
Olive oil
Salt
Directions Preheat the oven to about 400°F.* Thoroughly clean the sweet potatoes, as described above. Cut into similar size cubes (you can go smaller or larger depending on the final use, but similar size is important for even cooking).
Place the sweet potato cubes in a large, oven-safe, covered dish (I use a large Pyrex casserole) and toss with olive oil and salt. Put the covered dish in the oven and roast the potatoes for 40-55 minutes, stirring halfway through.
Serve as a fabulous side dish, or toss into one-dish meals, soups, or wraps. I often use sweet potatoes in place of carrots in this soup, and they substitute well in other recipes.
*Temperature is flexible +/- fifty degrees or so if you have other food that needs a specific temperature. Roasting time may increase or decrease accordingly.