Garlic taste test

Guest post by Matthew; a follow-up to this post about growing garlic in the Midwest.

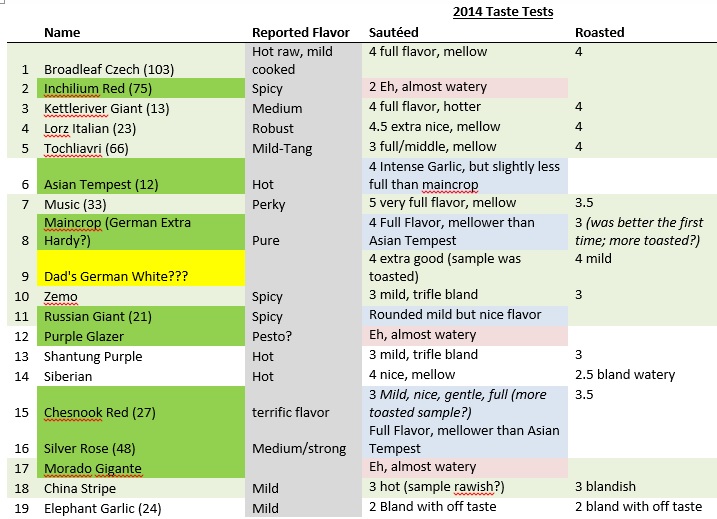
This was my second try at taste testing garlic, and I broke this year’s tests into two parts because I had 19 samples to try/compare.  I hope to do a tasting party at some point to get other opinions, but for now, all we have is my one set of taste buds.  (Melissa here to say that I did weigh-in on some of the garlic tasting!)

It’s also a tiny bit tricky thinking it was entirely fair, as some cloves were larger and needed longer to roast, or smaller and less time, and some seemed to sauté faster.  How do I get them all equally cooked?

That said, I think this is a reasonable testing and comparison.  I didn’t find the wine-like distinctions many garlic growers report in my cooked samples.  I don’t eat raw garlic (other than small amounts in pesto, hummus, etc.), so I didn’t bother tasting it that way.  I did find tastes that varied in being more or less full flavored, more or less hot, or neither and just downright watery.

My elephant garlic this year seemed to have an “off” taste in both roasted and sautéed tests.  Without the off flavor I don’t mind bland sometimes, for example, when I really just want the amazing creamy texture for a dip or soup that doesn’t need to be garlic-heavy.  Elephant garlic can be an easy way to get large amounts of mild, roasted garlic puree.

I don’t recall the off flavor from previous years, but coupled with my data that it just isn’t all that productive per square foot, it has been bumped way down in the pecking order of growing square feet.

I found my Inchilium Red to be rather bland, which is at odds with other taste tests, but could be my growing conditions, my seed stock, or weather conditions.  I’ll grow it another year or two, and do another taste test or so before I eliminate it overall.

I do have some low grade issues with brown spots on some of the garlic, possibly a fusarium (a fungus that can affect garlic) issue.  I rotate my crops, but I save my own seed stock.  I’m considering peeling at least one clove from every bulb next year to try to minimize how many spotted cloves get planted.

Otherwise, my tasting results are below.  You’ll notice that some are better roasters, others sautéed, and some are meh.  I’m using this data, and will be keeping track of how long each variety stores before deciding which ones I’ll grow long term, and which ones to cull from my stable.

I ranked each type and preparation on a scale of 1-5, where 1 is awful and 5 is awesome.

GarlicTasteResults

Combining the taste test data with the productivity, I think I’ll give everyone another chance, but if the data remains stable, I’ll probably keep the eleven below, and possibly some of the new ones I’m trying this year. That said, I’m eliminating eight varietals, which is a huge step forward for me!

TopGarlic

Planting garlic: Excitement and agony

A guest post by Farmer Matt

Who doesn’t get excited by growing gorgeous, flavorful bulbs of garlic with names like Music, Cherokee Red, Broadleaf Czech, Tochliavri, Inchelium Red, and Elephant Garlic?  Some people advocate planting around here in August, others in October after the first frost.  Last year I planted in August with good results, this year, due to the little one, I’m finally got it in on October 8 (no frost here yet), so we’ll see how it does.  For seed stock, I saved garlic from this year’s crop to replant and bought new varieties from Seed  Savers.  Time and conditions permitting, I may buy some Elephant garlic from Whole Foods and try to get that in as well.

Soil Prep
I definitely recommend planting garlic sometime in the fall for harvest early the following summer.  I plant it in well worked soil with good drainage and plant it in beds to avoid compacting the roots; this also makes it easier to apply a heavy layer of mulch.

Planting
Gently separate cloves, leaving as much of the paper wrapper on them as possible; plant 6-8” apart, or 12” apart for Elephant garlic.  Plant cloves pointed-end up, cover with ½-1” of soil, and then mulch with leaves, ideally chopped.

Harvesting
I cut off scapes in the spring when they’re about 12” long, and harvest when the plant’s leaves start to yellow, checking the bulbs for the cloves bulging through the wrappers to confirm that it’s time to harvest by gently digging the plants up from below.

The agonizing part is that with garlic the “seed” is exactly the same clove you want to eat.  Even worse, it’s one of the few plants where planting the largest cloves makes a big difference in the size of the bulb you’ll harvest next year, so you have to plant your most beautiful, gorgeous garlic to keep your quality high.  As I’m working on increasing my planting stock and my harvest, I had to plant most of my garlic.  I planted about 175 cloves, roughtly 30 bulbs.  My mother and my family have eaten maybe 8 bulbs each so far, and we both have 8 bulbs left, so we’ve used 32 of the smallest bulbs, and I’ve replanted half of this year’s harvest.

Twisted Caprese

When Matthew suggested adding peaches to our Caprese salad last week, I reacted with a bit of skepticism.  However, having recently read Emily’s post on combining tomatoes and peaches, I was willing to give it a try.

Chopped tomatoes and peaches with fresh basil, balsamic, olive oil, mozzarella cubes, and s&p.  The verdict?  A refreshing and fun twist on a Caprese salad — we’ll still eat the traditional, non-peach, version most of the time, but we enjoyed the change.

I made a lentil and millet pilaf to round out the meal, with whatever fresh veggies struck my fancy (carrots, garlic chives, yellow squash, orange bell pepper), dressed with some garlic olive oil*, a bit of red wine vinegar, and some s&p.  I stirred in some Dijon mustard at the end, one of my new favorite ingredients.  Plus some avocado (so NOT local) for added deliciousness!

* To make garlic olive oil, simply pour some olive oil in a jar and add a couple of cloves of minced garlic (a garlic press comes in handy here, but you can also just chop it up very small).  For maximum flavor, let sit a couple of days before using.  Keep refrigerated.  A little bit goes a long way, and at a fraction of the price of buying the Garlic Gold Oil that I’ve read about on KathEats.
Entry to Nupur’s Blog Bites 6: Potluck Edition.