This post goes back — waaaayyy back! It’s been awhile since I made this garbanzo bean soup, though I’ve certainly made it more recently than SIX years ago!
Fun to go back in time to 2009 (hi, stove in old apartment!).
In 2016, we’re officially out of garden-grown potatoes, so I actually had to — gasp! — go to the store and buy potatoes for this recipe. In fact, I think the only garden goods in last night’s batch were the garlic (thanks to Matthew’s work peeling, chopping, and freezing HUNDREDS of garlic cloves) and some celeriac that I pureed with the beans. If I had been feeling a bit more energetic, I could have subbed garden leeks for some or all of the [store-bought] onion.
This past week, we cooked a few of our favorite staple recipes, including vegetable upside-down cake and garbanzo bean soup, using almost all local ingredients. We thought these dishes tasted good before, but you can really taste the freshness of the garden and locally grown veggies (or you could, if you were here eating with us).
Someone needs to work on her food photography skills . . . .
If you’re wondering how to make this soup, today is your lucky day. In the past, I have been too lazy to post recipes here, but I submitted this recipe to my church cookbook, so it was typed and ready to go.
Garbanzo bean soup
4 ½ c. cooked garbanzo beans, divided (= 2 ¼ cups dry beans or 3 cans)
In my semester recap post back in December, I wrote about some changes I planned to make to bring create some space and balance: reducing my hours at my paid job and resuming a regular mindfulness meditation practice.
Mindfulness first! With the exception of three or four days, I have made time for formal practice every day for over a month now! I try for 15 minutes a day, but if five or ten minutes is what I have, I go with it. Gifting myself this time is a struggle some days, but it is SO important! It feels good to be back in the saddle.
As planned, I reduced my [paid] work hours from about 15 hours/week to 8-10 hours/week. Eight hours a week seems rather ideal, and it seems to be helping with the balance I was seeking, even though I have somewhat negated the reduction by adding an [unpaid] internship (≤5 hours/week).
My classes are going well, though none of them was quite what I expected. The Experimental Foods course doesn’t involve all that much time actually cooking. Instead, we have a team project that involves making one modification to one recipe over the course of the semester. Our instructor works at Bissenger’s [Chocolates], so our recipe had to somehow include chocolate. My team is making chocolate waffles.
My Advocacy in Family and Consumer Sciences course has some nice tie-ins with my Business Management course. We’ve picked a broad topic to focus on for advocacy, and mine is diabetes (likely drilling down to the issue of insurance coverage for Medical Nutrition Therapy for people who are pre-diabetic). The management course is all online, with very little interaction, so it’s a bit of a slog, but I’ll get through it!
In terms of workload, Advocacy and Experimental are both starting slow, with the bulk of the work during the middle and last half of the semester, so I may be in the calm before the storm right now.
I suppose I should mindfully enjoy the space/balance I have right now and not worry that times may get a bit hectic. That will happen (or not) regardless (though there is some foundational work I can do now to ease my workload later).
I like my chocolate dark and warm. Here are a few of my favorite preparations, just in time for Valentine’s day.
Drinking Chocolate
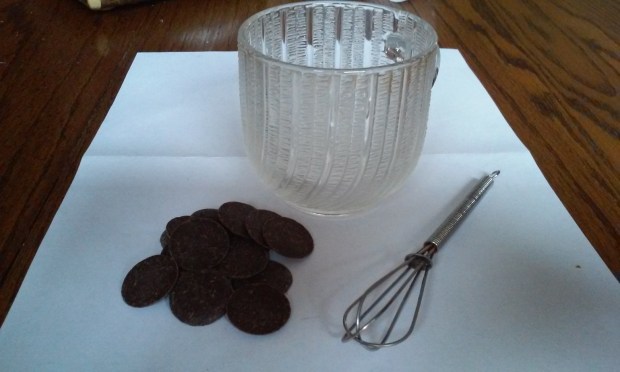
What passes for hot chocolate in most places is far too sweet and too watery for my tastes. I prefer a thick, rich drinking chocolate, similar to an Italian hot chocolate. My simple alternative requires only two ingredients: milk (any kind, but I prefer unsweetened soy milk) and dark chocolate (at least 60%, but I prefer 70%).
1/4 c. milk
0.7 oz. dark chocolate chips (or a bar, cut or broken into smaller pieces)
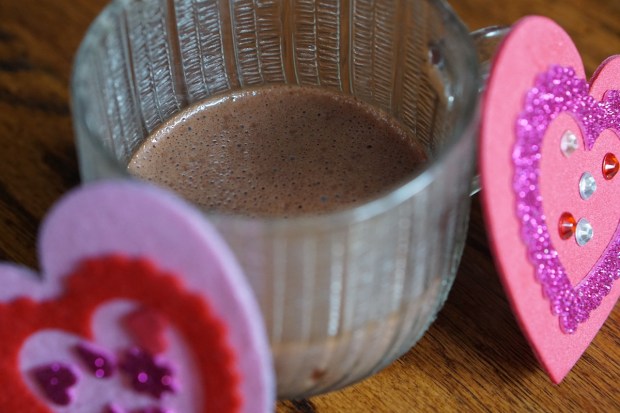
Directions: Place milk and chocolate in mug. Microwave for 30 seconds on full power. WATCH your microwave the whole time (a clear glass mug is helpful here). Cooking times can vary, and you may need to stop it sooner to avoid it boiling over (I know from sad personal experience!). Use the whisk to thoroughly combine the milk and chocolate. I’m not sure where I got that tiny whisk, but it’s really useful!
You can play around with adding a bit more milk or a bit more chocolate to get to your preferred consistency, which is a thin pudding, suitable either for sipping or spooning.
This slightly more involved recipe for an official Italian hot chocolate is worth checking out as well, though I usually turn to my easy, microwave version.
Chocolate Cashew Pudding
This started as a search for something warm and chocolaty, but a bit more substantial than the drinking chocolate. My version is a simplified version of this recipe.
1 cup raw, unsalted cashews, soaked in water overnight and drained
1 1/2 cups warm milk (I use unsweetened soy)
2 T. cocoa powder mixed with 2 T. sugar
2-3 oz. dark chocolate chips or chopped chocolate
1 t. vanilla extract
Blender or immersion blender — I found my immersion blender works better here, and clean up is easier!
If using an immersion blender, place all ingredients in a wide-mouth quart jar or place all ingredients in the jar of a regular blender. Let sit a few minutes so the warm milk can soften the chocolate. Blend until smooth.
The finished product will still have some texture to it from the cashews, so the mouth feel differs from a traditional milk-egg-cornstarch pudding. I like it!
Chocolate Chia Pudding
This was another attempt to make something more substantial than the drinking chocolate, but without the soaking step of the cashew pudding recipe. I start with the drinking chocolate recipe above, with perhaps a bit of extra milk to thin it. After whisking together the warm milk and chocolate, whisk in 2 T. of chia seeds. Let sit 5-10 minutes, whisking every once in awhile, until the chia seeds absorb some liquid.
Chocolate Peanut Butter
I’ve been making peanut butter for over a year now, and it was only a matter of time until I discovered chocolate peanut butter. If you already make peanut butter, this is really simple, basically just a matter of throwing some chocolate chips into the food processor AFTER the peanuts have been butter-fied. The residual heat from processing the peanuts melts the chocolate.
I used this recipe, with roasted, unsalted peanuts and 1 1/2 cups of chocolate chips per recipe. Melty, warm, and delicious on top of toast or pancakes!
To Your Health! With health-boosting components including antioxidants and flavonoids, dark chocolate can definitely be part of a healthy diet (check out this article for more details). A bit of high-quality dark chocolate goes a long way!
As I mentioned a few weeks ago, my name finally rose to the top of the library’s hold list for Marie Kondo’s The Life Changing Magic of Tidying Up, and I dove into the book, knowing I only had three weeks (no renewals allowed when there’s a wait list).
Within a day of checking out the book (hadn’t even started reading it yet), I found two lost items: a pair of earrings lost in the clutter on the top of my dresser (found when decluttering said dresser top) and Gabriel’s snow pants, inexplicably residing on the bottom of our closet floor (found when pulling out my breast pump, which I should have donated years ago). Kondo’s little book already seemed magical to me!
I used to be quite into tidying. As a child, I wanted my room to be just so, which was challenging while sharing a room with my not-like-minded sister! Somewhere along the line of sharing a house with someone, and especially when that became two someones, one of them a little person, and the general hum of life, I buried those old tendencies.
For a variety of reasons, the timing is right for some purging and organizing, and Kondo’s book gave me the push I needed. My biggest question was how to deal with all of the stuff that is not mine. Kondo advises resisting the urge to “tidy up” or downsize for others in the household, instead letting your own personal efforts have a trickle-down effect. This sounds overly optimistic, but despite my doubts, both Matthew and Gabriel initiated some tidying of their own. (Matthew actually beat me to sorting through clothes! And he read the book.)
That said, I don’t know if it’s a cultural difference, or just Kondo’s passion for the subject (and writing to sell a book), but there are some pretty hokey parts that you have to read with a big grain of salt. A skeptic also has to question Kondo’s claim that “no one ever relapses.” That’s a pretty bold claim without providing evidence!
Still, it seems her methods are sound, and it felt like someone was giving me permission to off-load lots of things that I was keeping “just because,” which was quite freeing.
Per Kondo’s method, I started with clothes. In the process, I discovered that I am more of a “practical” keeper than a “sentimental” keeper. Once I’m in the discarding groove, it’s fairly easy to see that I don’t need most sentimental items, but those old pants, that might be useful for some grubby task someday? A bit harder to part with.
To date, I’ve finished the clothing category.
Two tidied dresser drawers
I wouldn’t mind those drawers being a bit less crammed, but compared to how they looked before, this is huge progress. Seeing every item when I open a drawer will help me identify more items that are just taking up space, rather than being worn and enjoyed.
Books come next, but truth be told, I, personally, don’t have that many books (cough-Matthew-cough). Other than a gifted book here or there, I’ve always been a library gal (even when it requires waiting patiently on the hold list for a popular new item), and until I hit college, with the requisite text books, I did not spend money on books, despite being a voracious reader. My fingers get twitchy when I look at our bookshelves, but if anything is to happen in that arena, it won’t come from me.
I have jumped around a bit, tackling some low-hanging fruit, like boxes of old class notes and old work stuff. If I haven’t referenced my grad school course materials in the past ten years, I’m unlikely to start now. Yes, those binders contain some useful information, but it’s not organized in a way that is easy to access. If I wanted that information today, I’d look elsewhere. Enter the recycling bin!
So far, in addition to the recycling (and, yes, some trash), I’ve made two big trips to the St. Vincent de Paul store. While Kondo recommends that tidying up should be a somewhat discrete event, and not something that drags on forever, she also gives a time frame of six months for the work, which works well with where I am. I’d love to knock it out in a week (and I could see someone even doing it in an intense weekend, assuming they didn’t have too much stuff when beginning), but I can’t put the rest of my life on hold, so I’ll have to take the step-wise approach.
I’d love to hear your experiences with decluttering, simplifying, or “tidying up,” whether you used Kondo’s approach or something else — please share in a comment!
I started writing this post on a Monday (my first commute of the spring semester), when the temps started out in the teens, with single digit wind chills. Four days later, it’s sunny and 60°F in St. Louis — ah, fickle January weather!
On the Monday in question, I helped get Gabriel well-bundled, and then waved goodbye to my biker boys.
Gabriel reported that everything was still nice and warm when they arrived at his school, which I rather expected, given how many layers he had on. His mittens were perhaps the weakest link, but Matthew said his fingers were nice and toasty when they un-bundled (G has much better circulation than I do, apparently!).
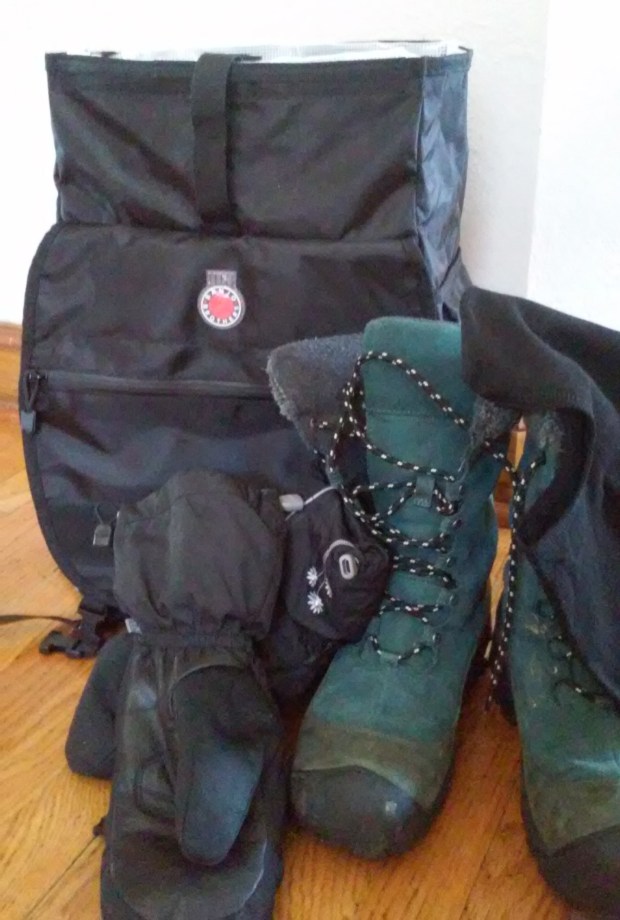
Later in the day, I put together my cold-weather gear, along with my new pannier-backpack.
For whatever reason, I don’t have great circulation in my hands and feet when it is cold (or even moderately chilly). Boots and mittens are a bit clunky on the bike, but if I’m going to ride in cold temps, they’re a must! Shifting with the mittens is a bit awkward, but doable. I was glad it had warmed up a bit by the time I departed, or I’m not sure my fingers would have made it 8 miles, even with good mittens!
I replaced the balaclava I lost at the end of last semester (I’m still planning to check the campus lost and found, but I didn’t want to be without one; on the off chance I find the original, having a back-up won’t hurt). I was happy that REI still carried the exact same product I bought however-many years ago — if something works, no need to change it.
After cramming our laptop backpack (with no laptop in it) into my grocery-bag panniers all last semester, I started investigating a better solution. The idea of something that functioned as both a pannier and a backpack was appealing. I read some old reviews that praised a product made by Timbuktu . . . that is no longer being produced. I knew I wanted the rack attachment points to be on the OPPOSITE side of the backpack shoulder straps, since the side facing the bike inevitably gets cruddy. With the Timbuktu pack not an option, Matthew found this pannier/backpack by Banjo Brothers (my Christmas gift from my parents).
It’s a backpack . . .. . . and a pannier!
While it doesn’t have as many organization options as many backpacks, it does have a few pockets, and it’s plenty workable. I’ll have to report back on its comfort as a backpack after more testing.
At this point, the only thing I would change is the length of the straps that fasten the top flap over the opening. With the current design, I can’t fasten the buckles on the flap when the pannier is fully open, instead I have to roll down the top first. I’m going to look into getting some kind of strap extender to remedy this.
On school days, I’m using this on one side and one of the old grocery-bag panniers on the other side. The backpack carries my school stuff plus bike lights and tool kit. The open pannier carries my purse, insulated lunch bag, U-lock, and cable.
Despite not having ridden my commute route (or all that much otherwise) for a few weeks, Monday’s commute went well. These next couple of months have the potential to bring some of the trickiest weather for biking, but I’m hoping my biking:motoring ratio for this semester will be as good as it was last semester!