Holiday eats

Feels like just yesterday we were looking at ideas for Thanksgiving meals, right?  Despite the many lovely recipes in the NYTimes Vegetarian Thanksgiving compilations, my search for something featuring tempeh ultimately led me to the orange-maple tempeh at 101 Cookbooks.

The tempeh went perfectly with the wonderful array of traditional sides that my mom prepared, including mashed potatoes, dressing (AKA stuffing), mixed green salad, and whipped sweet potatoes (from my dad’s garden — candy sweet with no sugar added).  I doubled the recipe to insure we had enough for leftovers, which were delicious topped with the vegetarian gravy I made.

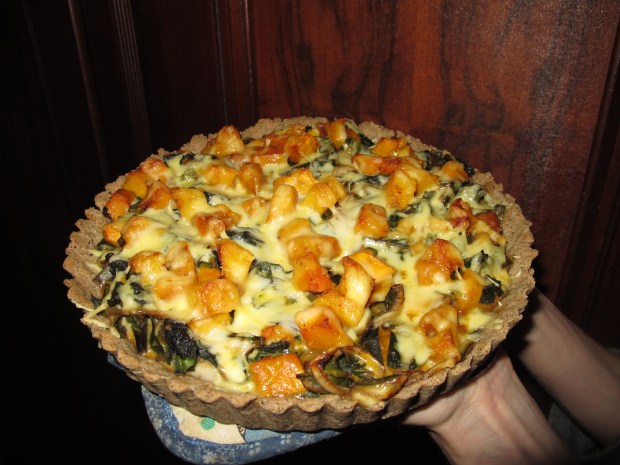
Still, our perusal of other holiday recipe ideas left us with a nice list of things to make later, including this Buckwheat Harvest Tart.  It looked labor- and time-intensive, so we kept postponing it, but I took advantage of my baby-free Monday last week and spent most of the afternoon in the kitchen, working with this guy. IMG_1019

Perhaps Matthew will share the real name in the comments, but I call it “the big warty squash.”  Less-than-attractive nickname aside, this is a delicious variety of winter squash, with lots of rich, flavorful flesh (and the seeds roast well, too).  I cubed some for the tart (along with some Silver Bell, another of our favorite squash varieties from this year), but I was left with quite a lot for roasting.  I followed my usual, fast and easy, slice and rub with coconut oil approach.

IMG_1023

Roasted squash perfection — yum!  But not to be outdone, here’s the star of the show, pre-cheese sprinkling step and before oven time.

IMG_1024

The various flavors came together so well here, showing the value of a good recipe.  Labor-intensive, but worth it!

IMG_1028

We’re brainstorming ways to use the flavors of the filling in dishes other than tarts.  For starters, you could certainly omit the eggs and serve the cooked veggies over pasta or another grain.

After making this on Monday, I settled down to simpler meals for the rest of the week, and Matthew focused his attention on baking cookies, old favorites and a new-to-us variety.  More on those later . . . .

Of mice and sweet potato wraps

Before we get to the food part, a little update: we did not just have a single mouse, we had mice, and the first mouse we caught was, in fact, not That, as evidenced by its lack of a kinky tail.

Within twenty-four hours, we caught a total of three mice, using my baiting method with the basic wooden spring traps.  When I told my mom, she asked if we were emptying and reusing the traps, and I was a bit taken aback, because the idea of not reusing them hadn’t occurred to me, but I guess some people treat them as a single-use item.

Oh, and she actually asked if Matthew was emptying the traps, and I might have been offended, but Matthew had, in fact, graciously taken on that grisly duty with no discussion, and I certainly wasn’t fighting him for it, making it hard to object to my mom’s assumption.

Anyway, we’ve had two baited traps out with no catches for six days now, and I have not seen or heard any signs of mice in that time, so it still seems we may have caught them early.

On to a delicious weekend lunch that came together quickly, thanks to leftover roasted  garlicky sweet potatoes and frozen [homemade] tortillas* — sweet potato wraps.

IMG_0988

The leftover sweet potatoes already had miso sauce on them, so I continued that theme to make a sauce for the wraps, whisking almond butter, miso, and water to create a nice, thick sauce.

Ingredients
Almond butter-miso sauce
Roasted sweet potatoes
Lettuce
Diced tomatoes or mild salsa
Cilantro
Tortillas

Directions
Spread sauce on a tortilla, then top with lettuce, warm sweet potatoes, tomatoes/salsa, and fresh cilantro.  Enjoy!

IMG_0985

Sometimes the meals where you just “coast,” enjoying the fruits of earlier kitchen labors, are the best.  I just wished we’d had enough roasted sweet potatoes for seconds!

*I’m still working on perfecting my 100% whole wheat tortilla recipe.  I used whole wheat pastry flour, which gave a nice, light result, but I think they suffered from the lower gluten content of said flour.  I plan to stick with the pastry flour and add some gluten for the next round.

Farinata, farinata

Dormez-vous? Dormez-vous?

For some reason, farinata makes me start singing that song in my head.  I’m sure it’s not an indication that I’m crazy or anything, just a little different perhaps (spatula fetish, anyone?).

Anyway, we’re talking about farinata, a flatbread from the Liguria region of Italy, not the French song Frère Jacques.

We first encountered farinata in Cinque Terre.  Upon our return, I discovered a big bag of chickpea flour at an international grocer, and I’ve been experimenting with my own version ever since.

I combined aspects of these two recipes to create my current incarnation of farinata.

Farinata

Recipe  by Melissa

Ingredients
1 c. chickpea flour
1 3/4 c. water
1/2 t. salt
2 T olive oil, plus more for pan
chopped onion (opt.)
fresh rosemary
freshly ground pepper
2-4 T. white flour
Shredded cheese for the top* (a soft cheese that melts well works best — we like creamy Havarti)

Directions
Combine chickpea flour, water, salt and olive oil.  Whisk until smooth, and set aside for at least 2 hours, or up to 12 (I usually make this in the morning to cook at dinner time).

Preheat oven to 450 degrees.  Saute the chopped onion in a large cast iron pan with generous olive oil (ours is about 10-12 inches across, which works well for this size recipe).  Add the rosemary and pepper to the batter and whisk to combine.

The batter will be fairly runny, like pancake batter.  I’ve found that adding a couple tablespoons of white flour at this point helps the overall consistency.

Once the oven is hot, and the onions are sauteed, pour the farinata batter over the onions and put the pan in the oven.  Bake for 20-25 minutes, then add the shredded cheese and return to the oven for a few minutes to melt the cheese.  Enjoy right out of the oven.

*For a dairy-free version, top with red sauce and/or sauteed vegetables.  Of course, these additional toppings are also good with the cheesy version.

A Snotty Vegetarian — To Be or Not To Be

I came across this article as I perused the November issue of Sauce :

And now I’m faced with a dilemma.  You see, I was so planning on being a snotty vegetarian this Thanksgiving.  The experience would look great on my resumé, right up there under “Snotty Bicycle Health Freak.”  Heck, it may be just what I need to get my resumé noticed.

But now that I’ve made a batch of the vegetarian dumpling soup from the aforementioned article, I feel like I really have no excuse.

As much as I enjoy my chickpea flour dumplings (great flavor plus a nutritional boost from the bean flour), I’m glad I opted to follow the recipe and try something new.

As usual, I didn’t follow the recipe too closely: whole wheat pastry flour and butter for the dumplings, and lots of variations when it came to the soup/stew, but that’s the beauty of a soup.

I didn’t roast any veggies for my soup, but I did have some roasted veggie broth on hand from deglazing a baking tray earlier in the week.  I’d used [most of] our leeks in another soup, so I just used onion, plus a bit of leftover leek greens (yes, you can those).

Instead of carrots, I used sweet potato, which I adore in soup, plus that’s what we had on hand from the garden.  I’m still figuring out how to hit that  sweet spot with the sweet potatoes: melt-in-your mouth tender, but not mush.  These were close, but a little overcooked.

I used lima beans instead of the called-for cannellinis.  I really liked the limas, but a white bean would definitely work, as would garbanzos.  Either way, I applaud the author’s decision to skip fake meat (she said snottily).

The dumplings were beautiful, fluffy little pillows that rounded out the soup nicely.  To avoid soggy leftover dumplings, cook as directed, then immediately transfer the cooked dumplings to a separate dish and refrigerate in a separate container (i.e., not sitting in the soup).

Since I made this soup late last week (and just finished the leftovers for lunch yesterday), I most likely will not be using this recipe for Thanksgiving this year.  Instead, I’m thinking something featuring tempeh, and I’m browsing recipes, including those here and here, for inspiration.

Sold on squash

When all was said and done, this year’s [winter] squash harvest topped 800 pounds.  That’s a lot of squash.

This picture shows the portion that Matthew harvested fully ripe.  We have this much again that should ripen and be good for eating down the road (though perhaps a bit less flavorful than the fully vine-ripened).

We also sold a total of 250 pounds of the squash harvest to Local Harvest Grocery and Five Bistro, so if you want a taste . . . .

The [modest] profit helps cover some of the costs that go into the garden every year, including seeds, straw for mulch, and soil amendments.  (Though we’ve played around with the idea of growing food for a living, I can’t imagine how much you’d actually have to grow to support yourself.)

The remaining squash leaves us with a decent bit to use throughout the next several months.  Fortunately, we like squash, and it’s really quite versatile: roasted and served as a savory or sweet side dish; cooked and pureed to make soup, custard, or pumpkin bread; cubed or diced and used in place of carrots in soups, stews, and other one-dish meals.  And don’t forget chocolate pumpkin cake!

With the cooler temps, I’m really enjoying excuses to turn on the oven (a complete one-eighty from my summer behavior of avoiding it at all costs).  If the oven will be on anyway, roasting a squash is an easy way to make use of the heat, since they can cook at whatever temperature you’re using for other recipes, as long as it’s in the 350°-450°F range.  Coconut oil is the secret ingredient.

quick roasted squash side

Pseudo-recipe by Melissa

Grab a squash, slice it, rub the slices with coconut oil, and sprinkle with salt if desired.  Lay slices flat in a single layer on a rimmed baking tray.   Bake for 15-25 minutes (depending on thickness of slices) at 350°-450°F, then flip each slice and bake for 10-20 additional minutes, until they reach desired tenderness.  Serve as is, or dress up with spices and herbs of your choice.