Recent eats and recipe: Lentil Fennel Soup

The garden is bountiful these days: loads of red and black raspberries, bunches of greens, big bulbs of fennel, and sweet, crunchy sugar snap peas.

I love eating the sugar snap peas as-is (and so does Sir), but we have enough that I felt like experimenting, so I tried this sugar snap salad recipe.  Fortunately, I had grabbed some mint from my MIL’s yard, so I was good to go (I didn’t have shallots, so I just substituted some onion).  It was a snap to make and tasty, too!

Next up, marinated fennel.  I started this on the same afternoon that I made the pea salad, planning to give the fennel a nice long marinade before using it for the next day’s dinner.  It just so happened that the fennel marinade in the recipe I wanted to try was almost identical to the dressing for the pea salad, so I just made extra and tossed it on the fennel.

IMG_4484[1]

The next night, the marinated fennel paired with fresh mozzarella and grilled bread for a satisfying, summery sandwich (recipe here), shown above in a deconstructed, bread salad version that I tossed together for a picnic dinner later in the week.

We’re awash in fennel right now, so I created a lentil soup recipe to make use of the fennel, as well as some greens.

LENTIL FENNEL SOUP WITH WILD RICE
Recipe by Melissa

Ingredients

One large bulb of fennel
1-2 T. butter1-2 T. olive oil
Chopped garlic scapes or minced garlic
Oregano (dried or fresh)
1/4 t. tumeric
1/2 t. onion powder
1 t. salt
1 c. dry lentils
1/2 c. wild rice
3-4 c. loosely packed fresh spinach, washed and chopped

Directions

Cover wild rice with 2 c. water.  Bring to boil, lower heat, and simmer for 60 minutes.

Cook lentils in 4-5 cups water.  The extra cooking water will become part of the broth for the soup.  Once at a boil, simmer for about 15 minutes until tender, but not mushy.

Meanwhile, quarter fennel (discarding tough core, if present), then chop into bite size pieces.  Sauté fennel in butter and olive oil, with a bit of salt, about 10 minutes over medium heat.  Add the garlic or scapes and sauté an additional minutes, then turn off heat.

Puree about 1/3 of the cooked lentils and 1/3 of the cooked fennel with some of the extra lentil “broth.”  Combine puree and all remaining ingredients in a large pan.  Check salt and seasoning level, and adjust as desired.  Simmer 2-3 minutes to wilt spinach.

0613141820-00

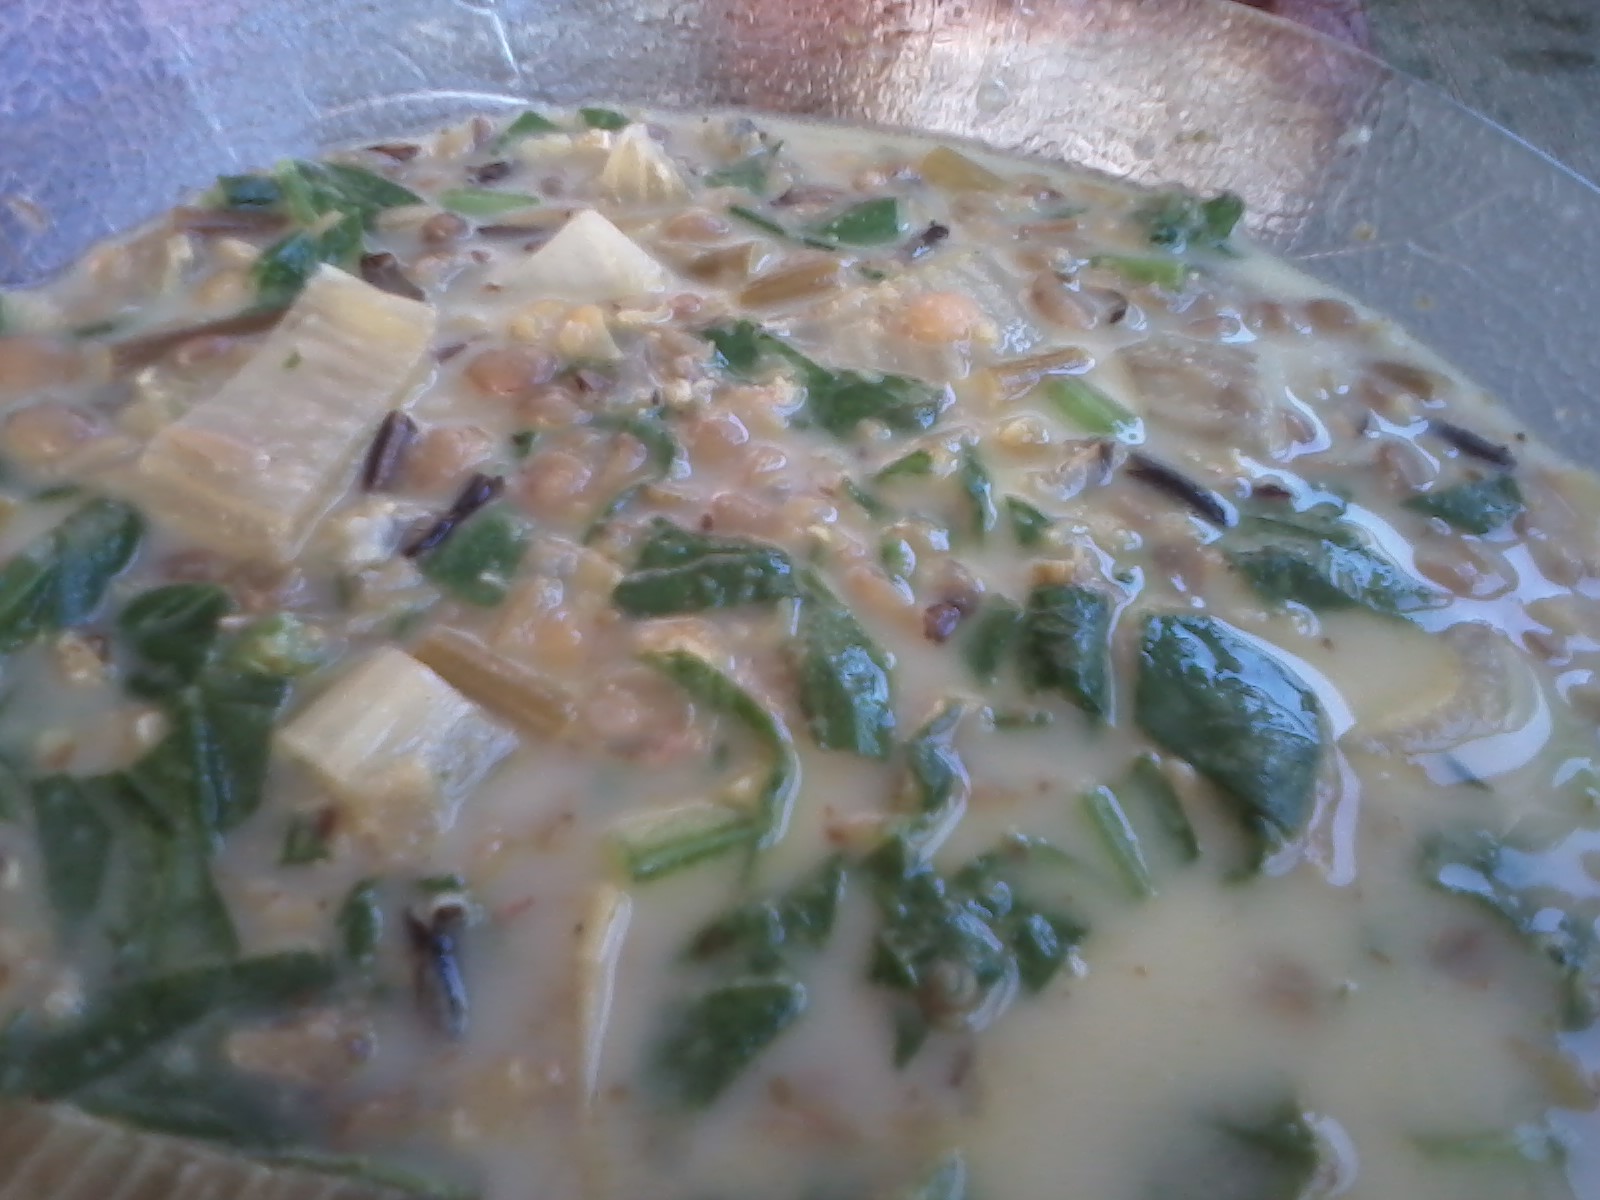
This was good the first night, but, as is the way of soups and stews, it tasted even better for lunch two days later, after the flavors had time to meld.


Linguini with rhubarb and carmelized onions

I visited my family in Iowa over Memorial Day weekend, and, upon arrival, I discovered a treasure trove of magazines.  I’m a closet magazine junkie — I love reading books, but there’s just something about sitting and flipping through a magazine that feels fun and indulgent.

I don’t subscribe to any magazines myself, between the environmental and monetary costs.  I could get more magazines from the library, but I don’t.  Anyhow, I indulged in magazine fest while at home: Self, Health, Parents, and Better Homes and Gardens.  (My mom sent some back to StL with me, so the mag-fest continues!)

The May issue of BHG had a whole section of rhubarb recipes, including several savory dishes, and the rhubarb linguini caught my eye.  Once back in StL, I was on garden duty while my boys and MIL were in Florida, and, lo and behold, we had rhubarb to harvest.

I started out by more or less following the recipe as printed.  My garden harvest also included a ton of greens, so I made a side of sauteed spinach with carmelized onions to go with my pasta.  Turns out that was an good move, as the sweetness of the carmelized onions was just what this recipe needed to balance out the tart rhubarb!

It’s been for. ev. er. since I’ve posted a recipe.  Sorry about that, and here you go!

IMG_4407

LINGUINI WITH RHUBARB AND CARMELIZED ONIONS

Recipe by Melissa, adapted from BHG May 2014
Serves 6-8

Ingredients
12 oz. whole wheat linguini
2 c. thinly sliced onion
4 c. loosely packed spinach or kale
3 c. 1/4-inch thick slices rhubarb
4 cloves garlic, finely chopped
1/3 cup olive oil
4-6 oz. freshly grated Parmesean cheese
1 T. dried parsley
chopped fresh parsley

Directions
Carmelize the onions.  While the onions cook, start working on the other steps.

Wash and chop the spinach.  If you haven’t already chopped the rhubarb, chop the rhubarb.

Bring a large pot of salted water to a boil.  While waiting for the water to boil, grate the cheese and chop the garlic.

Cook the pasta according to package directions for al dente noodles.  One minute before the pasta is finished, remove one cup of pasta cooking water and reserve.  Toss the chopped rhubarb in the pot with the pasta, cook one more minute, and drain.

Sauté the garlic in olive oil in the hot, now-empty pasta pan.  Add spinach and carmelized onions.  Add the pasta and rhubarb.

Lower the heat, and add the cheese, dried parsley, and reserved pasta water.  Mix until well combined.  Turn heat to medium, and cook, stirring constantly, for two minutes.

Garnish with fresh parsley and freshly ground black pepper to serve.

 ———–

This was tasty the first night, but I think it tasted better the second time around, after the rhubarb mellowed a bit and the flavors had a chance to mingle.


Strawberry freezer jam: More fruit, less sugar

I have fond memories of helping my mom make freezer jam from berries we grew or bought, including strawberries, black raspberries, and red raspberries.

My MIL makes lovely cooked jams/jellies/preserves, but I wanted to carry on my family’s tradition, so a few years ago, with a bumper crop of red raspberries, I bought some Sure Jell (fruit pectin) and started jamming.

Rewind!  Did that recipe call for three cups of crushed raspberries and over FIVE cups of sugar?!?  I wasn’t making berry jam, I was making berry-flavored sugar goo.  Okay in small quantities, I guess, but not something I really want to consume frequently.

Unfortunately, traditional fruit pectin, like Sure Jell, relies on the sugar to work.  If you reduce the sugar when using Sure Jell, you’ll get a runny, improperly jelled jam or jelly, also no good.

A little hunting led me to Pomona’s Universal Pectin.  This pectin is activated by calcium, so you can use much less sugar, but still have well-jelled jam.

We have lots of strawberries coming in now, so I took advantage of the opportunity to try my first batch of freezer jam with Pomona’s pectin.

Here’s a comparison of fruit and sugar need to make five cups of jam with the two types of pectin*:

PectinComparison

That means that the fruit:sugar ratio is 4:1, or four times as much fruit as sugar, using Pomona’s Pectin, but a frightening 1:2, or twice as much sugar as fruit, when using Sure Jell.

I carefully followed the package instructions for freezer jam that came with the Pomona’s pectin, and I’m happy to report that I have almost six cups of lovely strawberry freezer jam, with 1/4 the sugar (compared to making jam with Sure Jell).

0528141652-00

Pomona’s Pectin is noticeably more expensive than other fruit pectins (and less widely available — check with your local health food store or WF; I’m pretty sure Local Harvest Grocery carries it, for StL folks), but it’s worth it to have a final product that is healthier and filled mostly with fruit rather than mostly with sugar!  I’m looking forward to testing it with raspberries in a few more weeks.

UPDATE (5/29/14): I went back and sampled some jam after twelve hours in the freezer.  Compared to the Sure Jell recipe, the jam made with Pomona’s froze a lot harder (i.e., more difficult to get out of the jar).  Scientifically, this makes sense: sugar lowers the freezing point, so the higher sugar Sure Jell jam freezes less hard than the lower sugar Pomona’s jam.  I think it’s worth the trade-off for a healthier jam, but I wanted to give a heads-up.

* The instructions with the Pomona pectin gave a range of sugar, from 3/4 c. to 2 c. to use for this amount of fruit.  I stuck to the lower end of that range, using perhaps a slightly generous cup of sugar.


Garden update: May 2014

The cold winter and chilly start to spring delayed some things in the garden, but never fear — gardening is happening!

IMG_4018

The garlic survived the cold winter, and is growing well.  The spring crops (beets, carrots, peas, cruciferous, greens, onions) are growing, but slowly.  If we continue to have a hot May, the spinach and many of the cruciferous veggies may bolt before yielding much.

Most of the summer harvest crops are in the ground: tomatoes, peppers, potatoes, green beans, and squash.  We are still babying the eggplant seedlings here, in pots, trying to get them large enough to stay ahead of the flea beetles.  And we’re awaiting our shipment of sweet potato slips, but those can go in the ground any time now.

This slideshow requires JavaScript.

Just a few quick pics — if you want the “fancy” version of the spring garden tour, see this post from two years ago.

We went from a few weeks of small asparagus and arugula harvests, to this past weekend, when Matthew returned home with the asparagus, plus bags of kale, collards, and rapa (another green you cook), AND over five pounds of arugula (most of which he sold to Local Harvest).

The strawberries are set, and some are starting to blush.  If Sir is lucky, some will ripen before he leaves for Florida next week.  If the birds decide to share, it looks like we might have a decent harvest of tart cherries this spring, as well.

How does your garden grow?  What crop are you particularly excited about this year?

Expanding our produce storage?

Since last summer’s garden bounty (and maybe longer), we’ve been thinking about getting a second refrigerator to help handle produce overflow.  While the garden produce technically already has two fridges (ours and my MIL’s), sometimes that is not enough, especially when we’re harvesting large amounts of bulky produce, like leafy greens.

While we may well put a second fridge to good use, it just seems excessive, and, while theoretically we could unplug it when not in use (winter and early spring months?), I imagine once we have it, we’ll find a way to use the space (e.g., storing apples), and it will be a year-round thing.

Plus, while having more fridge space may somewhat alleviate the stress of Matthew returning from the garden with BUCKETS of produce, there’s still the fact that we’ll have buckets of produce to deal with — it won’t just cook or preserve itself!  So, while Matthew’s been pushing for the second fridge, I’ve been dragging my heels, but knowing that it will probably happen sooner or later.

This second fridge doesn’t have to be anything fancy, since it will be living in our basement.  You’d think it would be easy to find something in decent used condition, at a very affordable price on CL, but that has not really been the case in our [sporadic] searching.  Plus, there is the complication of getting a vehicle to haul what we find.

So, on Monday night, when Matthew happened to check CL and saw a posting for a working fridge for $80 located relatively nearby, he jumped at the chance, especially when the seller offered delivery that night for an extra $20.  Matthew drove over to check it out, decided it was a go, and returned home to wait for the delivery.

Wrangling a full-size refrigerator into our basement was hardly what I was in the mood for after nine o’clock at night, so, as a compromise measure, we decided to just stick it in the garage.

Half past nine found us in our dark, rainy alley, alone with the couple selling the fridge and the truck with the fridge, along with a full-size van and two unknown males (who arrived with the sellers).  Them: 4.  Us: 2.

For all intents and purposes, it looked like the lead-in to a Craigslist urban legend, where we end up bound and gagged in the garage while they rob us blind.*

Fortunately, that did not happen.  You can accuse me of having a wild imagination, but Matthew was having the same thoughts.  Later, we decided it would have been smarter for one of us to stay inside, where we could keep an eye on things and call the police, if necessary.

Still under the impression that we wanted the fridge in the basement, the sellers had invited two friends along to help get it down there.  (As Matthew and I stood there contemplating how the two of us would get the thing to the basement, we rather wished we had stuck with the original plan.)

Anyhow, we got the fridge in the garage and they got their cash and headed out.  I’m still not thrilled that four random people now know the location of a garage full of bikes — guess I didn’t really think that through ahead of time.  In retrospect, we probably could have left the garage door down, and gotten it the rest of the way in by ourselves.

So, we’re now the proud (?) new owners of . . .

IMG_3944

. . . this guy.  Despite the freezer on bottom, which I thought was a relatively recent innovation, this fridge must be at least fifteen years old.  Age and appearance don’t really matter, but SMELL does.

Unfortunately, despite a nose that is super-sensitive to cigarette smoke, Matthew missed the fact that this fridge did NOT come from a smoke-free home (the owners were smoking outside when he arrived to look at it, so he assumed they always smoked outside, and walking through the smoke outside desensitized his nose to the third-hand smoke indoors).  While you might think that something that is mostly made of metal would not really pick up odors, that is sadly not the case.  Smoke is pernicious!

At this point, we’re not sure we’ll keep it, but we’re very glad it’s only stinking up the garage and not the basement and apartment, as well!  Some sources claim a thorough vinegar wipe-down will eliminate the smell.  We’ll give that a try, but I’m not so sure, and if it still smells smoky, it’s outta here (assuming we can find a buyer)!