Using up and starting anew

‘Tis the season for finishing what remains of last year’s harvest, getting some early tastes of this season’s bounty, and prepping the garden for much goodness to come.

The Old

  • In the “root cellar“:
    • Potatoes — For awhile there, I really wasn’t sure we would make it through all of these.  I’m planning a new potato triage strategy for this year’s harvest (more below).
    • Winter squash and sweet potatoes — Also a decent  bit to use yet . . . .
    • Onions — a couple of pounds of small (i.e., pain-in-the-butt to use) onions left.  The fact that I pay three dollars for a single (large) organic onion at the store may motivate me to put in the effort to use these.
    • Garlic — what’s left is a bit dehydrated, but still okay to use.
  • In the freezer:
    • In general, items in the freezer aren’t as urgent, but still good to make room for this year’s harvest.
    • Loot includes shredded zucchini (for zucc bread), red raspberries, chard, pureed winter squash, green peppers, and fennel.

IMG_3765

This meal made use of some of our stored potatoes (Purple Viking, which are white inside, and an all-blue variety, which look dark purple).  Plus canned beats.  The cabbage for the slaw was not from the garden.  And, alas, we don’t have chickens, so the eggs are from the farmers’ market.

So, potatoes.  They store best if you leave the dirt on after harvesting, but by this time of year, when they’re a bit wrinkly, cleaning them is a pain, especially the little ones.  For this year’s harvest, my plan is to immediately (i.e., within a few weeks of harvest) sort out all of the littles, wash them when their skin is still nice and smooth, and then prioritize eating them within a month.

The New

Thanks to the voles (ha!), we didn’t leave much in the ground this winter.  Instead of one long low tunnel (or a couple of shorter tunnels), as in winters past, Matthew put up one relatively small tunnel, mainly to keep the artichokes alive.  He also planted some arugula in that tunnel.

After the winter we had, I didn’t expect anything to survive, tunnel or no, but lo-and-behold, the arugula made it, and we’ve been having arugula salads for the past few weeks.

IMG_3774

It’s so nice to taste fresh, raw veggies at this point in the year, after lots of cooked veg all winter.  The meal also included some freezer goodness: green peppers, red peppers, and tomatillo sauce, plus some of our homegrown corn meal went into the corn bread casserole.
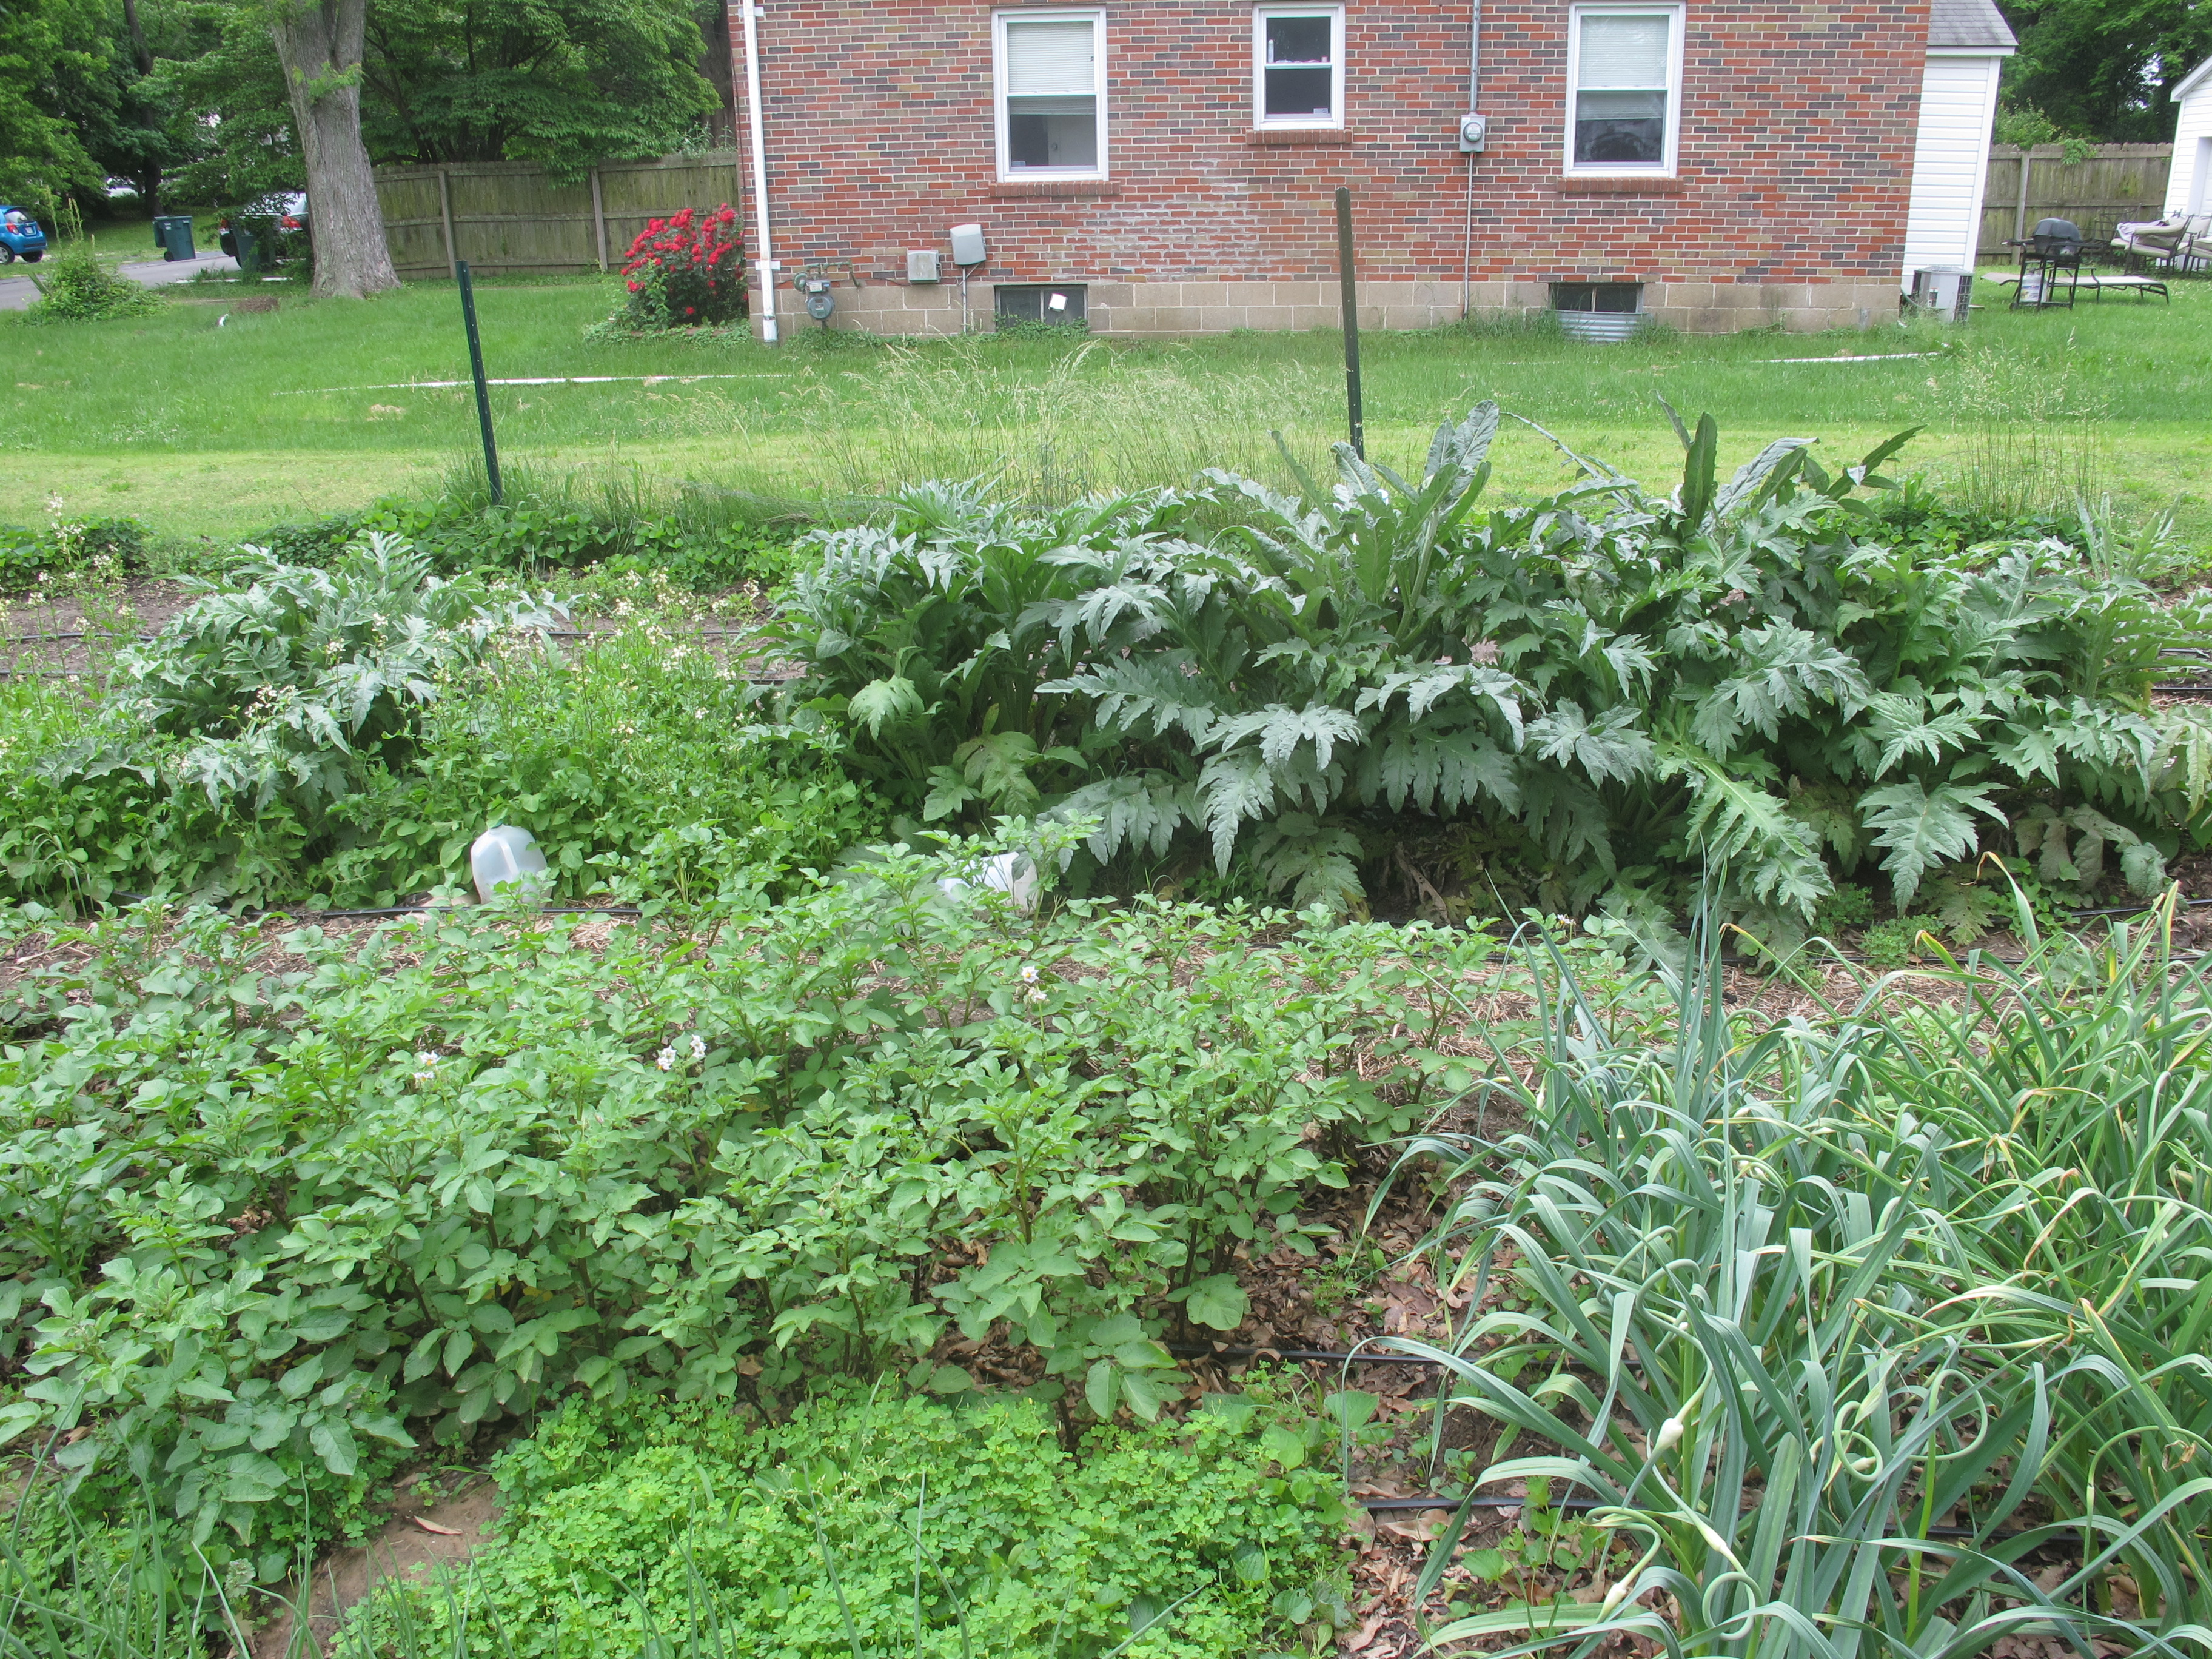
In the ground

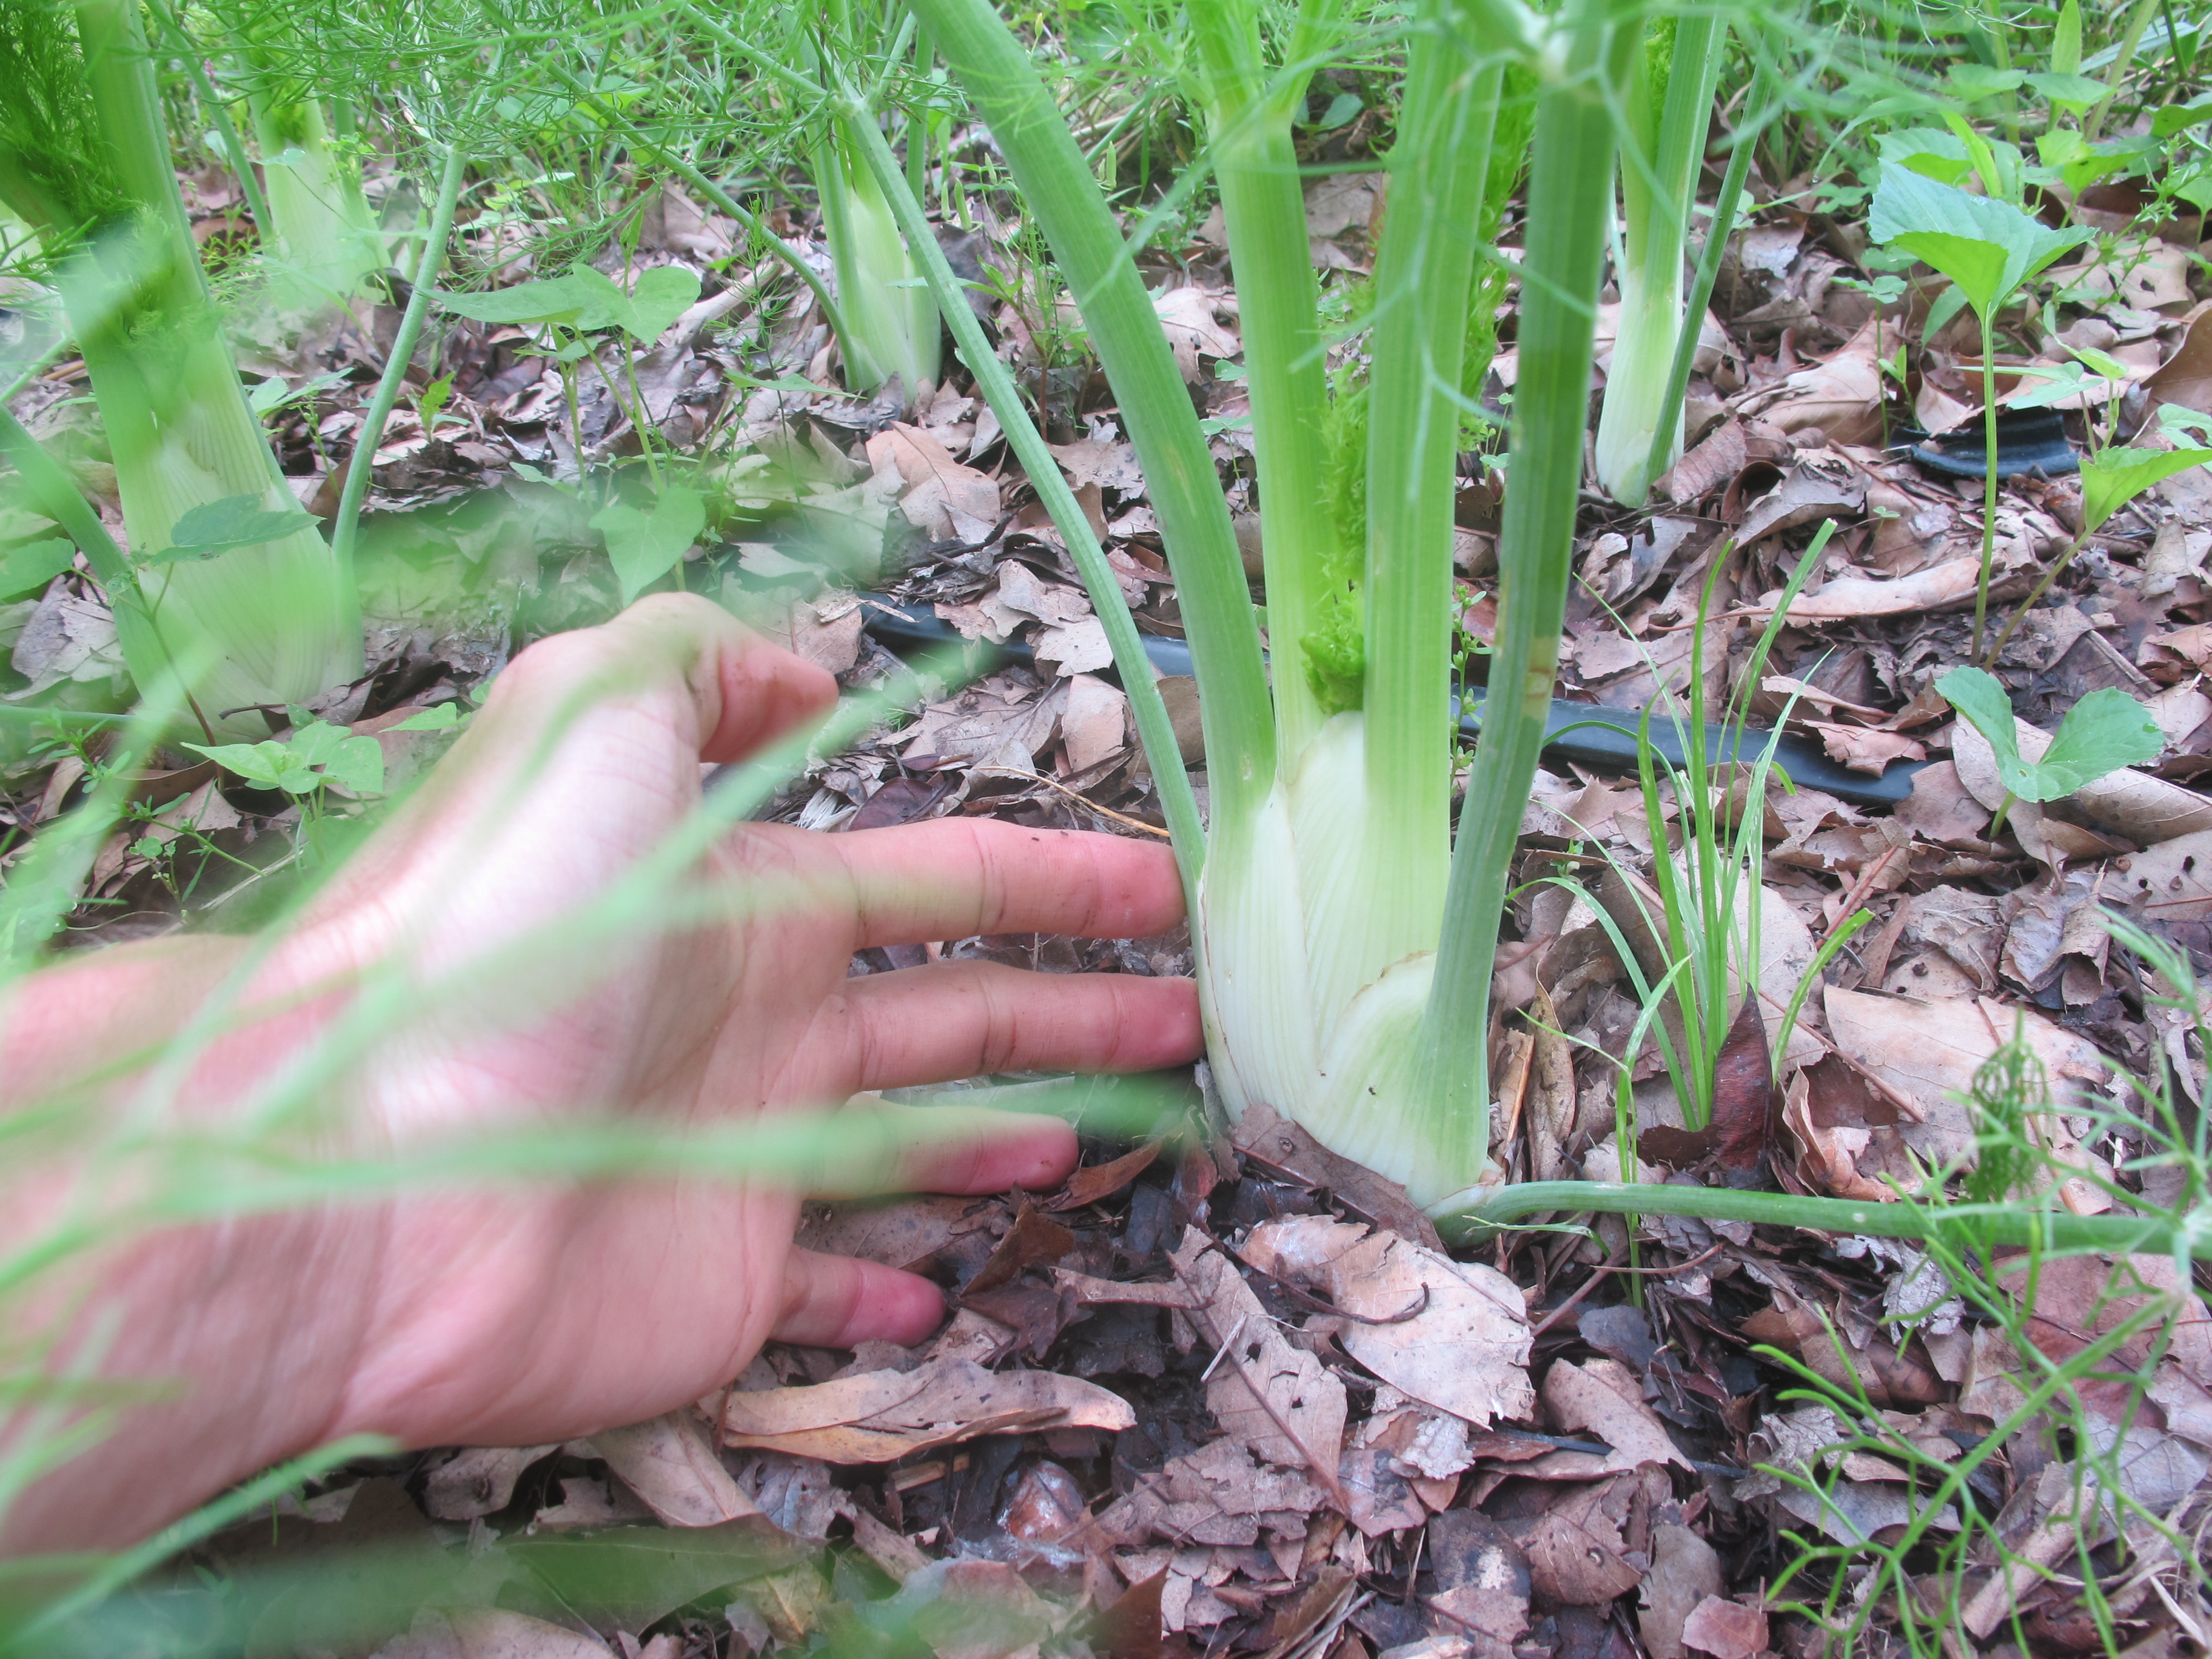
As of this past weekend, the spring garden is in great shape.  The potatoes are planted, along with all of the cruciferous seedlings, fennel, and onion starts.  So many plants ready to be outside and growing!

We are also starting a number of things from seed: peas, beets, lettuce, spinach, and chard — all in the ground!  Matthew’s mom made this awesome planting grid, that makes planting easier, faster, and so organized (I love that last one!).  I hope to get some pictures of the grid in action this weekend.

Recent recipe round-up

It seems like it’s been quite awhile since I wrote about food here.  Here’s a look at the last four week’s worth of eats, along with some recipe links.  The table below chronicles what we had for dinner each night.  Lunch = dinner leftovers.

I don’t plan out the week’s dinners at the beginning of the week, but I do sketch out which leftovers we’ll have for lunch on which day.  (On a good week, I start the week with lunches covered through Wednesday).  Then, I base the dinner plans on what we had for lunch, i.e., if we didn’t have beans for lunch, I want to incorporate them into dinner, or, if we had a wheat-based lunch (e.g., bread or pasta), I want a different, non-wheat starch/grain (e.g., millet, rice, potatoes, corn, quinoa, etc.) for dinner.

Frozen green beans and canned pickled beets

I’m enjoying the fruits of our labor, using frozen and canned garden produce as a component in many meals, which makes meal prep a bit easier, as well as stored potatoes, sweet potatoes, garlic, and winter squash.  This menu also includes our foray into eating sardines.

MenuTable

Recipe links and sources:

  • Black bean soup
  • Kugel (kind-of a shredded potato casserole-type thing): recipe modified from “Tante Malka’s Potato Kugel Deluxe” in Mollie Katzen’s Enchanted Broccoli Forest cookbook
  • Slaw
  • Fritatta (ours had potatoes and asparagus in it)
  • Snobby Joe’s
  • Spanakopita
Fritatta
Fritatta

Many of those dishes are just things I made up, with no official recipes, so if you’re curious about something, please ask, and I’ll be happy to reply with details and/or work on a recipe post.

Big things from the garden

Exhibit #1: A ridiculously large sweet potato

IMG_3565

Shown with a grapefruit and my hand for some sense of scale, what this guy lacks in beauty, he makes up for in size, weighing in at just over 12 pounds.  He suffered some damage from voles during the growing season, and his growth outpaced their eating.

I made a huge, way-too-thick batch of this sweet potato peanut bisque, which I originally read about over on Spatoola, with half of it.  I roasted the other half in big chunks, and stuck them in the freezer for a future batch of mashed sweet potatoes.

Exhibit #2: Lunga di Napoli winter squash

IMG_3628

Unlike the sweet potato, which was abnormally large, this lunga is rather par for the course for this variety.  It’s just a big ol’ squash.

We sliced and roasted about a fifth of it as a dinner side earlier in the week.  For the remainder, I roasted big chunks to puree into a simple soup consisting of squash, coconut milk, grated ginger, and a bit of salt.  This very simple soup perked up significantly with the addition of some carmelized onions, plus Paul’s beans.

I actually thought this big guy would go further, perhaps yielding some extra puree for pumpkin bread or pumpkin butter.  I guess that will wait for the next squash.

After a failed attempt at pumpkin butter last year, I finally figured it out several weeks ago.  Turns out that it’s pretty simple — you just have to let it simmer for. ev. er.  That’s the trick.  Anyhow, we’re about finished with my first batch, and I’m looking forward to making more.

Grain mill test run and cornbread recipe

Matthew grew two types of grain corn this year, one for polenta and one for flour.  He harvested a number of lovely ears and removed the kernels, at which point we were stuck.

I attempted to “mill” some of the polenta corn in our food processor, which laughed at my efforts as the kernels spun around making quite a clatter, but coming no closer to becoming corn meal.  Next up was the coffee/spice grinder, which kind-of worked, albeit in very small batches and producing a grain with uneven texture (some almost as fine as flour, but other grains still very coarse).  Due to the presence of the very large grains in the final product, the polenta took over three hours to cook!

Fortunately, a friend has an electric grain mill, and she was willing to let me take it for a test run.  I wasted no time milling all of our corn before returning the mill.

???????????????????????????????

I originally planned to try other [gluten-free] grains after finishing with the corn, but that never happened . . .

IMG_3289

. . . because it literally took hours to get a relatively small amount of corn kernels through the mill.*  The corn kernels (bigger than popcorn kernels) were at about the upper limit as far as size of whole grains that would work in the mill.  I suspected that smaller grains (e.g., rice, quinoa, millet, etc.) would flow through much more quickly, and my friend confirmed this.

Despite the rather ridiculous time input, this was my best option by far for turning the corn kernels into a form we could eat, so I stuck with it.

Even on the coarsest grind and slowest motor setting (which is also supposed to contribute to a coarser grind), the milled “polenta” corn was really too fine for making polenta.  We’ll use it in cornbread and other baking where we would use “fine” corn meal instead.

Similarly, the milled “flour” corn came out much finer than I expected.  Even “fine” corn meal has some grit to it, but this was really more like flour.  Matthew later explained that this was due, in part, to the variety of corn — a type that was a low “flint” level, which is what makes corn meal gritty.

Other thoughts:

  • This grain mill is a beast — it takes up some serious kitchen counter real estate.  Granted, it’s the kind of thing that you would use every now and then and store elsewhere, but still.
  • On a related note, this would be an ideal appliance for some kind of neighborhood (or co-housing) appliance share.  It would be easy to share among a number of households, and that would also help lower the cost.
  • Along with beastly size, this machine roars like a beast.  The noise wouldn’t have been a big deal for short periods of time (<15 minutes or so), but the whole having to run it for hours thing got old fast.
  • The hopped did not really work for my big corn kernels.  I did a good bit of manually stirring the kernels in the hopper to help keep things moving.  I don’t think this would be necessary with smaller grains.
  • The lid on the compartment that holds the milled flour has a rubber seal.  While I understand the necessity of the compartment being well-sealed, this thing was ridiculously hard to remove!

While the idea of being able to turn any whole grain into flour is appealing, an electric grain mill is not on my purchase-soon list, especially with a price tag near $300.

Now that all this corny talk has whetted your appetite, here’s cornbread recipe that I’ve been meaning to share, based on this recipe at Kitchen Parade.  I discovered and adapted this recipe about a year ago, and it quickly became a favorite.

SKILLET CORNBREAD

  • 1-1/2 cups buttermilk (I used soymilk and vinegar)
  • 1/4 c. olive oil
  • 1/4 cup + 1 T. mix of sorghum and honey (or just honey)
  • 1-1/4 cups yellow cornmeal, preferably stoneground
  • 1/2 cup flour (I used half and half rye and rice flours to make a wheat-free, but NOT gluten-free, cornbread)
  • 1 teaspoon baking powder
  • 1 teaspoon baking soda
  • 1/2 teaspoon table salt
  • 1 egg

Preheat oven to 450°F.  Place a 9″-12″ cast iron skillet on the stove top over very low heat to warm gently.

Combine buttermilk, olive oil, honey, and egg.  In a separate bowl, combine corn meal, flour, baking powder, baking soda, and salt.  Mix wet ingredients into dry.

Melt butter in the cast iron skillet to coat, then pour in batter and bake for 15-20 minutes.  Time will vary based on size of skillet.

Note: I most recently made this recipe using our corn “flour” in place of the corn meal.  While the resulting product was quite delicious, the lack of grit in the corn created a product with a texture more like a muffin or cake than traditional corn bread.  In the future, I will use our home-grown corn meal/flour for the 1/2 cup of flour in the recipe, and stick with store-bought, fine corn meal for the 1 1/4 cups of corn meal.

*I was 100% on-board with keeping the mill gluten-free, since my friend’s husband has a gluten sensitivity, and being able to mill their own GF flour was a big reason they bought the mill.  However, this meant that I wasn’t able to try making my own whole wheat Cream of Wheat-esque cereal, something that my oatmeal-shunning hubby wants to try.

Garden update

It’s one of those, “I haven’t posted in over a week, where do I start?” kind of mornings over here.  So, how about a little June garden tour and update?

IMG_2267

Strawberry season has given way to red raspberry season (with black raspberries — my favorite!) soon to follow.

IMG_2316

We’re currently harvesting artichokes (those crazy, spiky Jurassic-looking plants in the background — see here for artichoke serving suggestion) and the garlic (on the right) is almost mature.

Matthew harvested over six pounds of garlic scapes a couple of weeks ago, four pounds of which we sold to Local Harvest Grocery in Kirkwood.

We’ve been incorporating the rest into our meals, mainly using it as you would garlic, but adding it toward the end of cooking time since it’s more delicate.

IMG_2310

Pictured from front to back: feathery fennel fronds, cruciferous veggies, onions, and potatoes.

IMG_2311

We’ve been harvesting fennel, including some for sale to Five.  We roasted most of the fennel the last two years, but I’m experimenting with very thin slices for use in salads this time around.

We had a beautiful lettuce harvest (and lovely salads) for a few weeks, but most of the lettuce is bolting now.

It’s probably just as well, as I’ve concluded that all the greenery in huge salads makes my stomach grumpy.  It doesn’t happen every time, but often enough that I’m scaling back a bit and trying for less lettuce and more toppings.

We’ve also been enjoying fresh peas, including our first experience growing shelling peas.  They require a bit more work (i.e., the shelling) as compared to sugar snap peas, but they’re sweet and delicious — worth it!

Sir finds peas of all kinds delightful, and I learned the hard way that sitting next to him on the floor, attempting to shell and snap peas while he played, was a losing proposition when my goal was actually having peas left for dinner!

What’s growing in your garden and/or what fun local produce is on your plate this week?